Haymaking combines science and art. Old timers knew just the right feel of hay before it was ready to put into the barn. It’s hard to quantify that judgment with mechanical instruments. The goal of haymaking is to capture the nutrients in grass in a storable form to make them available as a forage feed in the winter months.
With the variables of New England weather, many farmers have switched to haycrop silage as a way to harvest legumes and grasses. In that process the hay is cut and wilted, then chopped and preserved by fermentation in the silo or wrapped into large round bales.
But there’s still a need for dry hay. It offers a practical way to raise young calves and feed roughage in small-scale livestock operations.

"One of the most critical factors in making quality hay is timing."
Timing
One of the most critical factors in making quality dry hay is timing. Producers need to time haymaking to coincide with the right stage of plant growth and weather conditions. The old timers used to talk about cutting hay around the Fourth of July, when they said “it was stout and had some bottom to it.” Although maximum growth of the plant and peak yields occur around that time, the nutrient value is greatest earlier in the season, when plants put most of their energy into vegetative growth and contain high concentrations of starches, proteins and minerals.
As plants mature, their lignin content (a component of fiber) increases and traps the nutrients within indigestable cell walls. Although cutting hay early will result in lower yields, the increase in nutritive value will compensate for reduced yields. The second, third and fourth cuttings that grow back are leafy and high in quality and often harvested when the weather is hotter, making the hay easier to cure. Sometimes growers need to make a little sacrifice by getting an early first crop from the field during periods of rainy, early summer weather in order to get the next crop growing.
One important part of timeliness is having the equipment maintained and ready to go when the grass is ready. The winter months are a good time to check the equipment over and replace any worn or broken parts. A delay in harvest caused by an equipment breakdown can never be made up. It is good to have an early start date for haying just to get things ready. Shoot for a goal of May 15, in southern areas and May 25, farther north, even though conditions may not be right at that time every year.
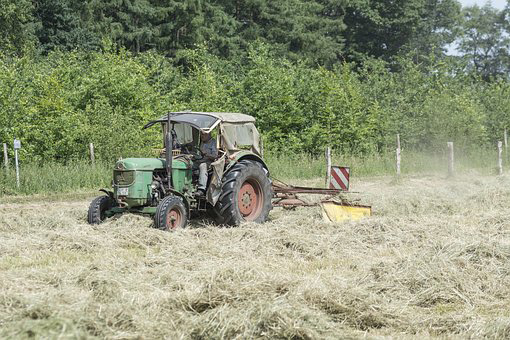
Mowing
The first step in haymaking is mowing the hay. The maturity of the grass is the determining factor for starting the first field of the season. The grass should be in the early vegetative stage, and not headed out, with enough growth to make mowing worthwhile.
Time your mowing around the most reliable weather forecast you can find. It basically takes about three days of good weather to cure hay. This can be a challenge in late May or early June. A good strategy is to mow just before or right after a rain, because of the likelihood of good weather for the next few days. Some people like to mow early in the morning to gain almost a day of drying time. Others prefer to mow at the end of the day when the grass is drier, in an attempt to increase the energy level of the forage by capturing some of the sugars that migrate up the plant stem during the day.
Mowing Equipment
Sickle mower
One of the earliest methods of mechanically mowing hay was the sickle mower. It is still used today, typically in small haying operations or for clipping pastures. These generally have a 5'-7' cutter bar. The sickle mower has a few disadvantages:
• Clogs easily with thick grass and hay that is bent over.
• Has a limited swath width.
• Can’t crimp or squeeze the grass stalks (to improve drying) in one operation.
Sickle haybine
As the next development in haymaking, the sickle haybine greatly improved the mowing process. It uses the sickle bar technology, but has a front reel that lifts up bent-over stalks and allows it to be pulled at a faster speed. In addition, the sickle haybine has a built-in crimper that cracks open the grass stems to condition the hay for quicker drying. It also deposits the hay out the back into a gathered swath. The sickle bar haybine is still used on many medium-sized farms. Used haybines are available at reasonable prices.
Rotary disk mower
The rotary disk mower has become the industry standard in recent years. It consists of several rotary disks equipped with small knives at the bottom that spin at a very high speed. These mow through thick hay well and can be pulled at higher speeds than conventional style mowers. The small blades are inexpensive and can be replaced when dull. If something is hit in the field, it usually only affects one unit, minimizing repairs. The disk mower can also be outfitted with a crimper, which deposits the hay in a gathered swath. Rotary disk mowers have a good turning radius, and come in models that will mow from 6' swaths to 10'-16'.
"Care should be taken to maintain a uniform mown height in the field. Leaving 3-4 inches of forages makes for quicker grass re-growth and less soil/ash picked up at baling."
Tedding
Once the hay starts to dry, it needs to be worked to promote curing. Tedding, the next step in haymaking, fluffs up the cut hay and allows the air and sun to contact the under-surfaces to promote drying. Hay tedders are generally wide units with several orbital wheels that lift the hay as they turn. Some styles have horizontal bars with teeth on a spinning reel. Some people ted immediately after mowing to spread out the swath.
Hay mowed early in the morning could be tedded that afternoon, as long as the mowed swath is dry on the top surface. It may require a second tedding the next day to speed up the drying process. Too much tedding can shatter leaves of alfalfa or clover, lowering the quality of the hay. Proper tedding can be the key to timely haymaking.
Raking
Once the hay has been tedded and is nearly dry, it is ready to rake. Raking turns the hay one more time to dry the bottom and forms it into a windrow ready to be baled. The windrows shouldn’t be rolled too tightly, as this creates a roping effect that prevents the hay from drying properly and causes it to clog as it enters the baler.
As a rule of thumb, wait to rake hay until after the dew has dried and the sun nears its peak, or around 11:00 am. If possible, let the raked hay sit for an hour or two before baling to allow more drying time.
Haymakers have several types of rakes available. The old style side-delivery rake, which can be PTO or ground-driven, is pulled at an angle to the tractor and has several rows of teeth on multiple reels that roll the hay into a windrow.
A pin-wheel rake consists of four or five large wheels with teeth mounted on them. The wheels turn by friction as the rake is pulled over the field.
Newer types of rakes have a series of rotary wheels that pull the hay together into a windrow. Some models of tedders are designed so they can be converted to a raking mode.
Most haymakers rake the outside swath in first, going counter-clockwise around the perimeter of the field. Then they reverse directions and roll the first windrow to the outside and continue in clockwise circles around the field. Some prefer to re-rake the first and second windrows inwards after the rest of the hay is baled, to allow additional drying and to make an easier passage with the baler.
Baling
Science and art converge in haymaking with the critical decision of when to start baling. Baling hay too early will trap moisture in the bale and result in spoilage. Baling too dry will cause leaves to shatter and break, lowering hay quality. It takes close visual observation and handling of clumps of hay from several windrows to “feel” if it is ready.
Hay ready to bale will have no bunches of green grass. It will have a brittle, crisp feel. To test its readiness, grab a clump of hay and hold one end of the clump in each hand. Pull vigorously with both hands. If the stalks break on the first pull, the hay is ready to bale. If it takes several pulls, it’s still too green.
Some haymakers like to use an electronic moisture tester to confirm their own observations. You can find many models in farm catalogs.
It takes a clear, sunny day to make hay. Although you may feel tempted to speed up the haymaking process when it is overcast or sprinkling lightly, it isn’t worth the risk of baling hay that will mold. It makes sense to add preservatives when you bale under borderline weather conditions, but small operations generally can’t justify the costs of the needed equipment. Furthermore, the preservatives may corrode the equipment.
Improperly cured hay (hay above 22 percent moisture) can also heat in the barn and cause a fire by spontaneous combustion. Generally hay is baled at a moisture content between 15 percent to 18 percent.
Hay stored at more than 22 percent moisture in a barn or stack is at risk of spontaneous combustion. When the internal temperature of hay reaches 130°F a chemical reaction begins to produce flammable gas that can ignite if the temperature goes high enough. At 150°F you enter the danger zone. Anticipate hot spots or fire pockets at 175°F. At 185°F remove the hay from the barn, with the fire department standing by to control flames as air contacts the hot hay.
This table provides a summary of haymaking practices.
Practices: Mow forage early in day.
Reasons: All full day's drying.
Benefits: Faster drop in moisture. Less respiration loss. Less likelihood of rain damage. High quantity, quality.
Practices: Form into spread swath.
Reasons: Increase drying rate.
Benefits: Faster drop in moisture. Less respiration loss. Less likelihood of rain damage. Less leaf shatter. Higher quantity, quality.
Practices: Rake or ted at 40%-50% moisture content.
Reasons: Increase drying rate.
Benefits: Faster drop in moisture. Less respiration loss. Less likelihood of rain damage. Less leaf shatter. Higher quantity, quality.
Practices: Bale hay at 15%-18% moisture.
Reasons: Optimize preservation.
Benefits: Less leaf shatter. Inhibition of molds, browning. Low chance of fire. Higher quantity, quality.
Practices: Store hay under cover.
Reasons: Protect from rain, sun.
Benefits: Inhibition of molds, browning. Less loss from rain damage. Higher quantity, quality.
Source: Silage and Hay Preservation - NRAES #5, Cornell University, 1990
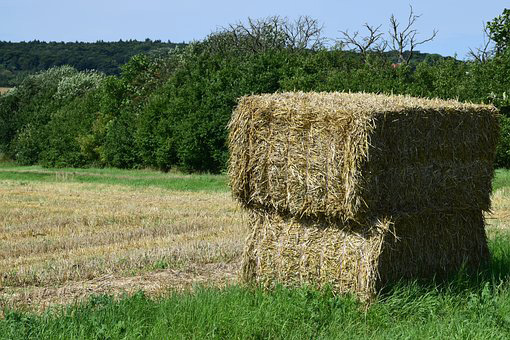
Round or square?
Hay can be made into round or square bales. Contrary to some beliefs, large, round bales don’t offer more flexibility in moisture content, but must be adequately dried. Since the core is packed very tightly, moisture can’t escape, accelerating heat build-up.
Some people store large, round bales outside, but with a 6-foot diameter bale, approximately 30 percent of the hay is wrapped in the outer six-inch layer. A few inches of spoilage results in a significant loss of dry matter. Big, round bales can be stored in a large, high-clearance shed; grouped in stacked rows and covered with plastic, or individually wrapped as they are baled.
While round bales do offer the advantage of mechanical handling, they may be difficult to market to small livestock producers. Here are some ways to mechanize the handling of small, square bales:
• Attach a bale loader to the side of a truck, and mechanically convey bales onto the load.
• Use a commercial bale handling machine that loads and stacks bales.
• Haul basket-type steel wagons behind a conventional baler that will accept the bales as they fall off the tailgate.
• Use a kicker baler which ejects the bales onto a wagon hauled behind.
• Drop the bales in the field and pick them up with a truck or trailer.
Square bales are generally stored in a barn. They can be elevated to the top of a barn, conveyed along the peak of the barn and randomly dropped in piles or stacked by hand. Stacking may increase the storage capacity of a space. Stack successive layers in opposite directions to add stability to the pile.

in spoilage and wasted feed.
Field Losses and Quality Changes
Nutrients lost while the hay dries in the field lower forage quality. These losses occur for several reasons:
• Plant respiration converting plant sugars to water and carbon dioxide increases the fiber and decreases the energy in the feed. Drying hay as rapidly as possible limits respiration losses.
• Rain falling on hay before baling leaches out valuable nutrients and reactivates plant respiration. Getting hay wet is the biggest frustration of haymaking. It lessens the quality and requires repetition of the hay-drying steps to prepare the hay again for baling. If you only expect a light rain and can’t haul the hay under cover, consider baling the hay up tight and letting moisture from the rain dry off for a day before putting the bales in the barn.
• Although losing small amounts of nutrient-rich leaves is normal during the haymaking process, raking when the hay is extremely dry will increase these losses. Hay should be handled as little as possible to maintain nutrient quality.
Good hay is hard to make and takes careful management. Timeliness is key. Once it is in the barn, it should be sampled and tested to evaluate the quality and to best determine the concentrates needed to go with it to balance a ration. For information on sampling and testing hay, see the UNH fact sheet Hay Quality.
Written by John C. Porter, UNH Extension Professor and Dairy Specialist
Download the resource for the complete fact sheet.
Contact
