
Selecting healthy plants
Take a step back to examine the plant’s overall structure. Shrubs should have several stems coming from the base of the plant. Most trees, on the other hand, should have only one upright trunk and branches should be evenly spaced along the trunk. A few species such as birch are sometimes grown as clumps and so may have multiple trunks. In general, however, you should avoid purchasing trees with double trunks, dead branches, trunk cracks or wounds, or leaves that show signs of insect damage, disease, or drought. Avoid buying weedy containers or ball-and-burlap (B&B) products so that you don’t introduce more weeds to your own landscape. The presence of weeds, algae, or decomposing burlap on a B&B plant also indicates that it was harvested quite some time ago.
Choose plants with healthy root systems. Healthy root tips are generally light in color; older or diseased roots are dark colored. If the plant is container-grown, carefully remove the pot and take a look at the roots for yourself. A good root ball will stay intact. Avoid pot-bound plants, plants with a thick root mat at the bottom, or with numerous large-diameter roots circling inside the container wall (Fig. 1).
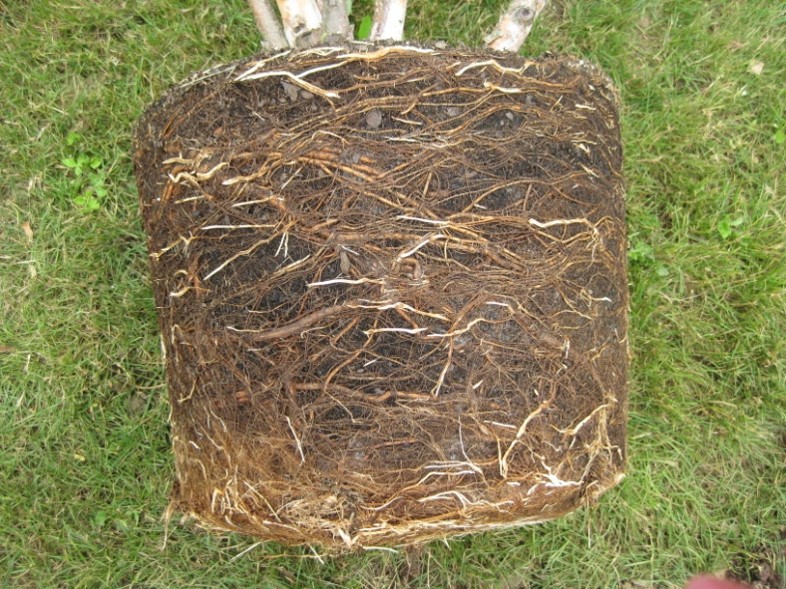
This plant is“pot-bound” or “root-bound”.
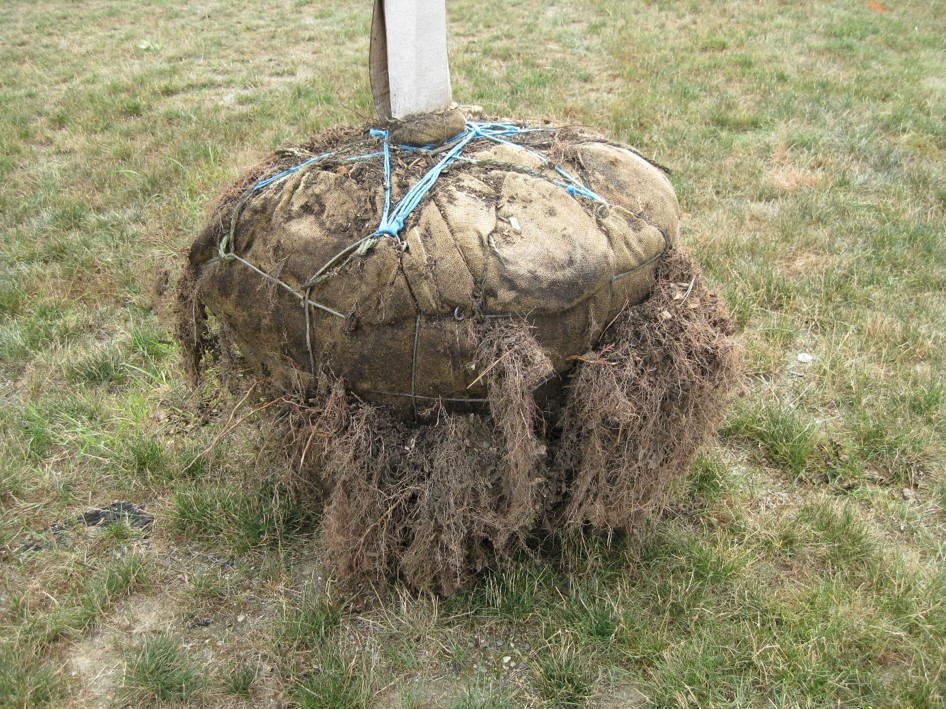
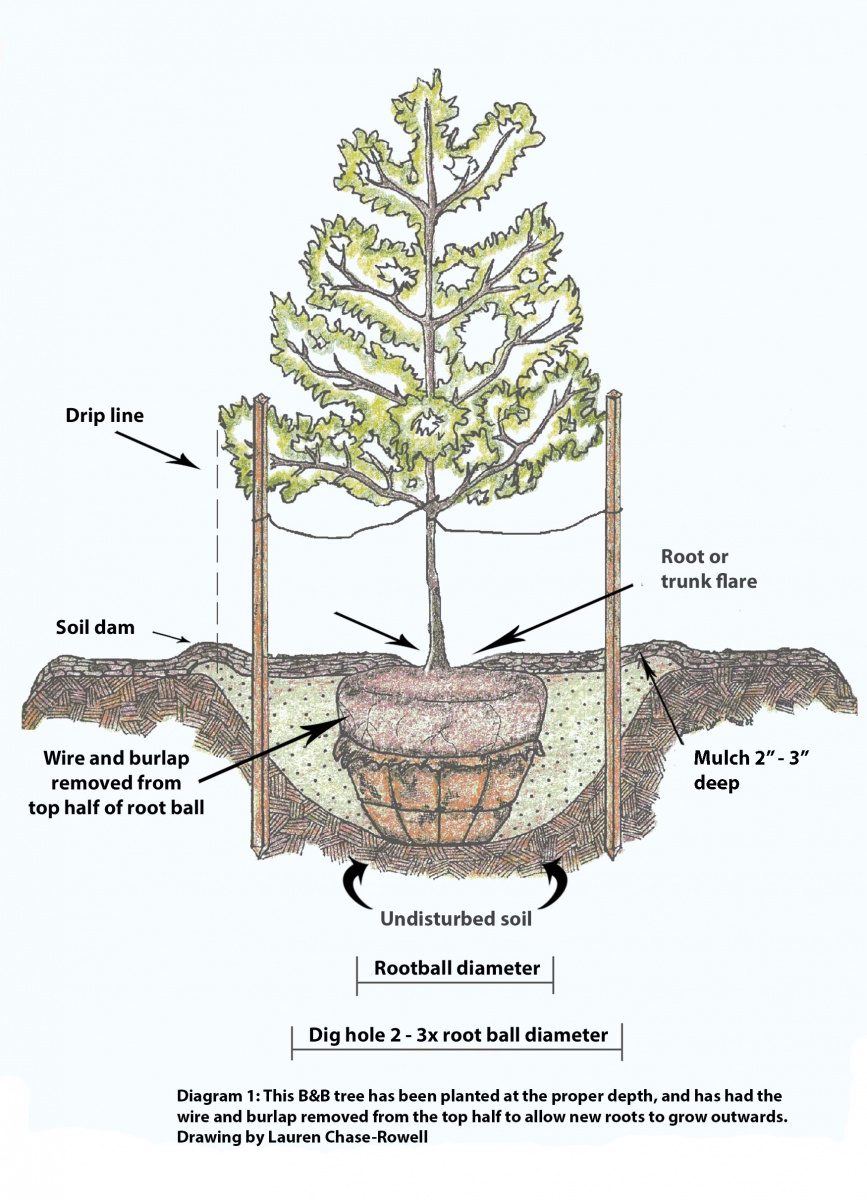
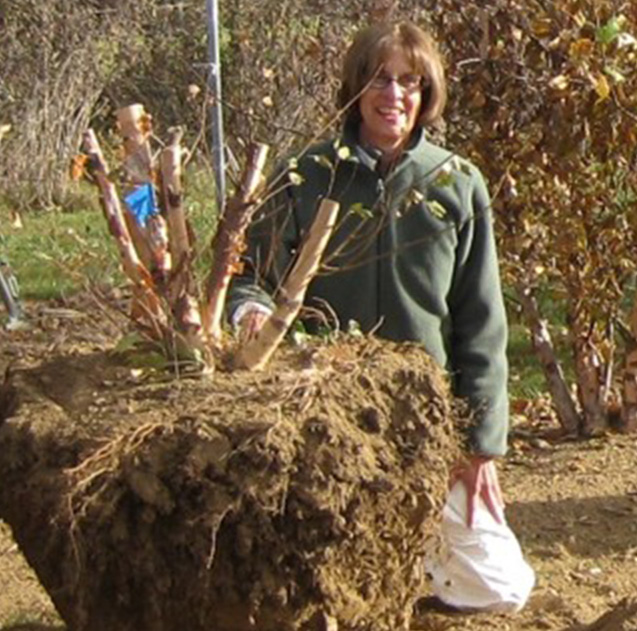
It’s harder to check field-grown, B&B plants (Fig. 2), but you can. The trunk should taper outward where it enters the soil and you should see a few major roots connecting to the base of the trunk at the soil surface (see Diagram 1). If not, probe into the soil ball about three inches away from the trunk with a blunt nail or wire, trying to locate a few large roots within two inches of the surface. If you don’t find any, avoid that plant because it is buried too deep. Many of the tree’s roots are left behind in the nursery when a B&B plant is harvested, but the structural roots present in the soil ball provide enough stored energy for new roots to grow out quickly, under good conditions.
A third type of planting stock is sometimes available: trees grown in porous fabric containers, sometimes called grow-bags (Fig. 3). Roots in these fabric containers are generally dense but fibrous and the larger roots should form swollen nodules at the container edge, rather than circling like in a plastic container (Fig. 4). The nodules store carbohydrates that are used for rapid root growth once transplanted. Trees grown in fabric containers are lighter weight and easier to handle than B&B plants, so they require staking and frequent watering after transplanting. Research at UNH shows that these root systems have structural advantages for trees and may enhance growth and longevity.


Transporting and storing your plants
When moving your plants, handle them by the wire basket or container and not by the trunk or branches. Move small plants in a van or car trunk but don’t leave them exposed to excessive heat in a parked vehicle. Larger shrubs and trees should be laid down in a pickup bed or trailer, secured to prevent rolling, and covered with a tarp during the ride home, to avoid windburn. Load and unload them carefully; avoid dropping or bouncing plants on the ground. Many B&B trees weigh over 250 pounds, so specialized equipment is needed to move and install them.
The best thing for your plants is to transplant them as soon as possible. If you can’t plant right away, water them frequently to prevent the root balls from drying out. Plants in containers will need watering daily in the summer; sometimes even more than once a day. If you find they dry out too quickly, you may want to give them a temporary home in the shade. B&B plants still still need watering every 1-2 days but won’t dry out as quickly as containers.
Digging the hole
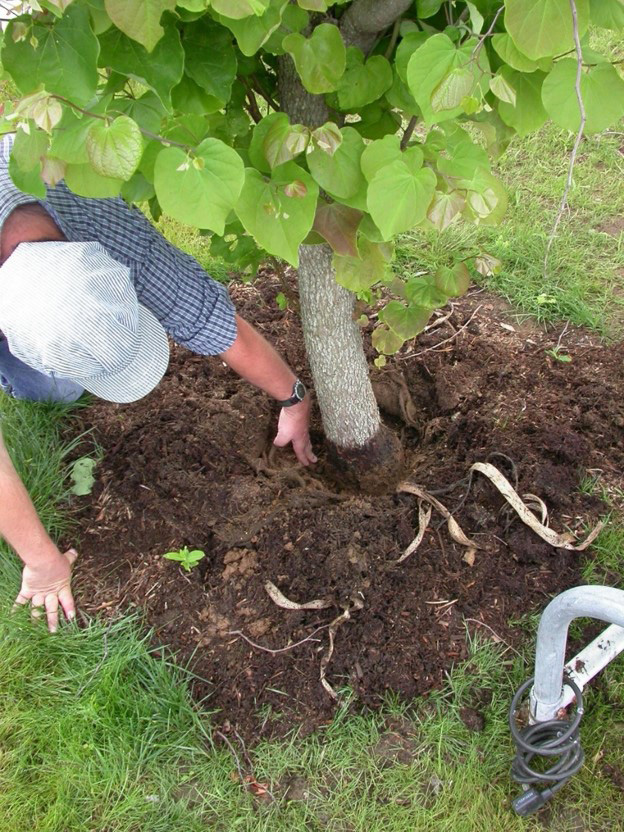
First, find the trunk flare (also called the root flare) on your tree or shrub. This is the base of the trunk which tapers out just above the first permanent roots. Small temporary roots may have grown above the root flare if the plant was too deep or covered with soil or mulch – ignore these small roots and find the topmost woody root growing radially out from the trunk; usually it will be at least ¼” in diameter. If there is excess soil or potting medium on top of the permanent roots, carefully remove it to expose the trunk flare. Any temporary small roots above the flare can be cut off with hand pruners.
Measure the height and diameter of the root ball now. The most common mistake people make when planting a new tree or shrub is making the planting hole too deep and narrow. Instead, dig a hole only as deep as the height of the root ball. Make the hole two to three times as wide as the diameter of the root ball; the sides may be sloped as shown in Diagram 1. Digging a wide hole loosens the soil and provides a good environment for new roots to begin growth.
At this point, you should have a healthy plant ready to be planted into a properly-sized hole. Carefully place it in the hole to check the depth. If you’ve made the hole too deep, remove the plant and place some soil back into the hole, firming it with your foot. The soil underneath needs to stay firm so the plant doesn’t settle later on.
Did You Know?
The most common mistake people make when planting a new tree or shrub is making the planting hole too deep and narrow.
Planting
Now you're ready to plant. If the plant is in a pot, remove it by sliding it out sideways on the ground. If circling roots are visible on small plants, slice the root ball downwards with a sharp knife in three or four places around the outside of the root ball, an inch or two deep, cutting through all the outer, horizontally-growing roots. After placing it in the planting hole, try to position the roots in a radial pattern to encourage them to grow in an outward direction (Fig. 5), and firmly pack soil in between them.
For large trees or shrubs, simply slicing the root ball is not likely to be easy or effective. Instead, cut any visible circling roots over 1/4 inch diameter with hand pruners. If there is a root mat at the bottom, cut and remove it as best possible. While root pruning may seem harsh and is stressful to the plant, research has shown that leaving circling and/or matted roots may prevent plants from establishing a normal, outward growing root system, which is essential to the long-term survival and health of the tree or shrub. It is best to select a plant that is not root bound or matted to start with.
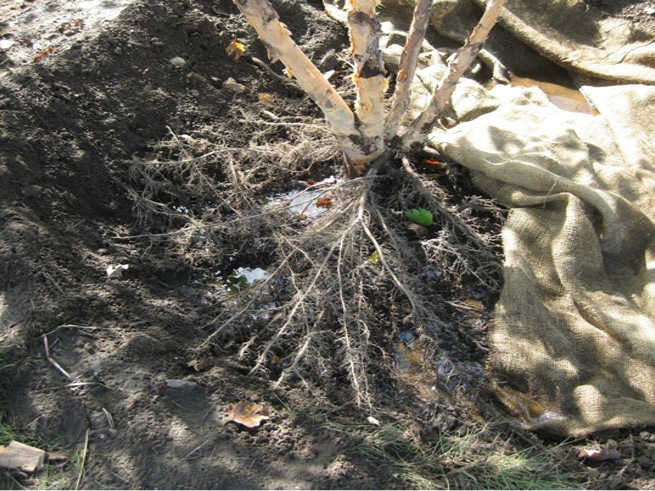
from the trunk in a radial pattern,
like spokes on a wheel (top). (These
roots have been exposed for illustration;
you should not expose the
roots on your plants.)
If preparing a B&B plant, remove as much of the wire, burlap, rope, straps and other ties as possible, but avoid breaking up the soil ball while doing so. It may be easiest to strategically cut the basket in several places with wire cutters, then set the plant in the hole and stabilize it. Now continue cutting and removing all the wire, wrapping and strapping materials, and as much of the burlap as possible. At a minimum, you should expose at least the entire top half of the soil ball. It's okay to leave some wire and burlap on the bottom half, if necessary, because almost all the new roots will grow outwards from the top half of the original soil ball, not downwards from the bottom half (Diagram 1). Make sure, however, that the materials left on are natural and therefore biodegradable; avoid leaving any nylon straps or synthetic burlap (Fig. 6).
too deeply and the straps and burlap were still wrapped around the trunk (right
photo).
Fabric containers must be completely removed before planting. Cutting them from top to bottom with scissors or a box cutter will then allow you to peel the container away from the sides and bottom. If small roots have grown through the sides, just cut them off before removing the container (Fig. 3). Once the container is off, check for circling roots and cut any you find, but be sure to leave the nodules intact.
Place the plant in the center of the hole and check again that it is at the proper depth. Next, fill in around the root ball with the soil you saved from digging the hole, just leave out the rocks! In most cases, there is no need to amend the soil with organic matter. Research has rarely shown any benefit to using hydrogels, root stimulants, mycorrhizal inoculants, or other additives, except in the poorest of soils. However, it is a good idea to have a soil test done ahead of time so that you can add the proper amounts of lime and essential nutrients at planting.
On some sites with poor-quality urban fill, amending the soil with equal volumes of compost and sand may be beneficial. If the soil is very heavy (clay soil) or very sandy, adding ten percent (by volume) compost or peat moss to the backfill may be worthwhile. Otherwise, it is not worthwhile because the roots should rapidly grow through the backfilled soil and out into the surrounding soil. Preparing the hole properly is more important than adding any amendments.
Firm the soil by hand (or tamp lightly with your foot) as you backfill. You can add water when the hole is half full to help settle the soil, then again when you've finished planting. Making a shallow, donutshaped dam of soil around the outer edge of the planting hole to form a shallow saucer is an option which may help if planting on a slope or site where the water tends to "run away" from the plant before sinking in (Fig. 7). You can break up the dam before winter to prevent ice from accumulating around the trunk.
Preparing the hole properly is more important than adding any amendments.
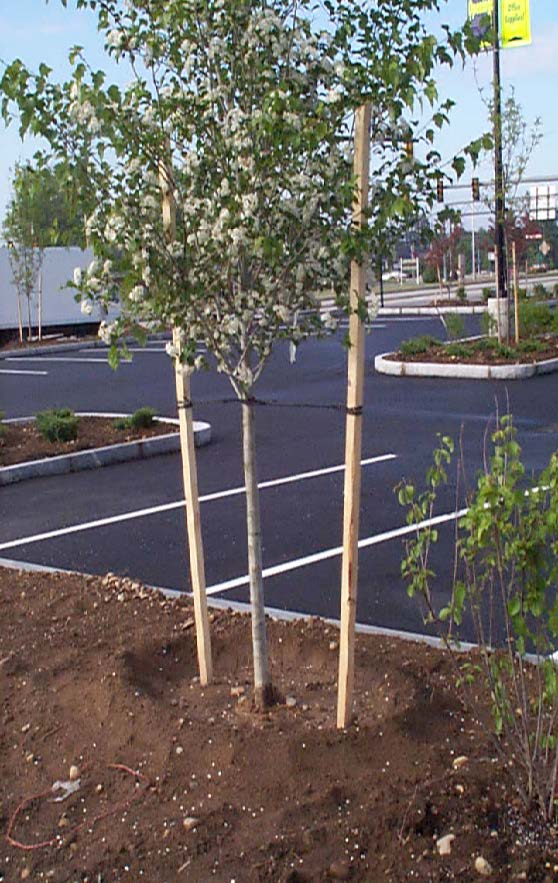
planted and staked. Note the
donut-shaped soil dam. Now it
needs water and mulch.
Watering
Water is the most essential resource that you can give your new plant. Immediately after planting, water slowly but thoroughly to saturate the entire root ball and backfill area - this could take a couple of hours with a slow trickle from a hose. Thorough watering eliminates air pockets, rehydrates the plant and provides the water necessary for survival and growth.
Water frequently for the first few weeks, every other day if there's no rain and you have a well-drained soil. After that, water a B&B plant every five to seven days if needed, until late fall. Trees from containers dry out very quickly and need more frequent irrigation than B&B trees for the first several weeks--even into the fall months, which is a good time for root growth. Apply water right over the original root ball, as well as to the backfilled area, because water from the surrounding soil will not move laterally into the porous potting medium where most of the roots are. Skip watering only if you get more than an inch of rain or can tell that the soil is moist. Don't depend on your lawn sprinklers to provide the right amount of water for your new shrubs or trees.
How much water to apply will depend on plant size, weather, time of year, soil type and drainage. Apply enough water to wet the soil a foot deep throughout the rooting area. Under good growing conditions and well-drained soil conditions, apply about an inch of water each time (just over a half-gallon per square foot of soil surface). While a small shrub may only need half a gallon, ten gallons may be required for a 2-inch diameter tree.
Applying water slowly so that it soaks in is much better than applying it rapidly with a hose. If you do use a hose, set the nozzle to a shower or gentle spray setting. There are tree bags (Fig. 8) or rings that you can purchase and place around your tree that hold several gallons of water and allow it to ooze out slowly through small holes. For larger plantings, drip irrigation or soaker hoses may be worth the investment.
On the other hand, avoid over-watering any plant. This is likely only if you have clay soil and/or underlying poor drainage; in this case, the loosened soil around your newly-planted tree or shrub may fill up like a bath tub and drown the roots. If in doubt, do a percolation test before you plant and make sure that water drains from the hole completely within 24 hours. If it does not, make sure to choose a tree species that can tolerate a wet or poorly drained site.
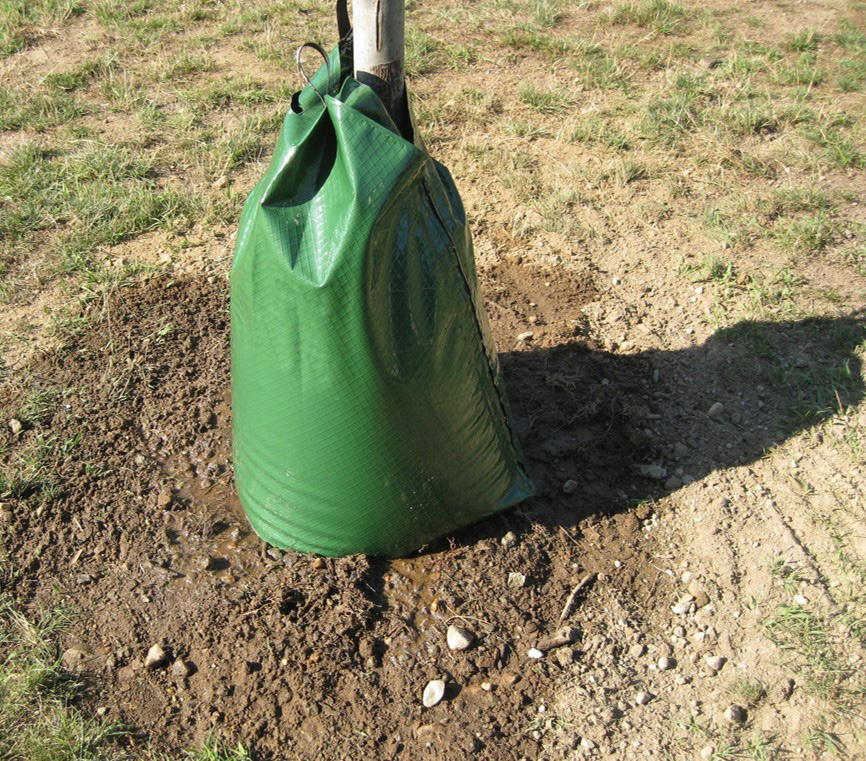
be used to provide slow application
of water over the root zone. Don't
forget to refill them frequently.
Mulching
Mulching gives your plant a competitive advantage over grass and weeds, so that it establishes roots and resumes growth more quickly than unmulched plants. Mulch also helps keep the soil moist and moderates soil temperatures.
You have several mulch options. Shredded bark, nuggets, or wood chips are good choices, as are pine needles. The color doesn't matter to the plant. Avoid any mulch which smells sour or is hot to the touch. A thin layer of compost may be used as a mulch but may provide a good environment for weed seed germination over time. Covering the compost with a larger particle-size mulch such as wood chips will help prevent weed growth.
You have several mulch options. Shredded bark, nuggets, or wood chips are good choices, as are pine needles.
Staking trees
Large trees may need staking to stabilize the root balls while the roots grow out into the surrounding soil, especially if they were grown in containers or fabric bags. Use two sturdy stakes, pounded firmly into the soil just outside the root ball at the time of planting, for a tree 2-3 inches in diameter (measured 4 inches above the root flare). A smaller tree needs only a single stake -or may not need to be staked at all, unless it is a very windy site. Attach the tree loosely with a flexible material mKeep an eye out for damage caused by insects or diseases. Identify the pest and make informed decisions before applying any control measures. But remember, the key to getting your plant off to a good start is planting it properly and providing adequate water during the critical first year.
Spread the mulch in a uniform layer two to three inches deep over the entire root ball and outwards at least to the drip line of the plant (Diagram 1). Don't pile the mulch up around the trunk of your tree, known as volcano mulching. This common mulching practice can lead to disease and insect problems at the base, encourages rodents, may cause roots to grow upwards into the mulch, and can eventually result in the decline and death of your plant. Pull the mulch back a few inches from the trunk or stem instead, allowing for good air circulation around the trunk flare.
Follow-up care
Water as needed for a year or more. Shrubs will become established during the first year, but trees will take more than one year to grow anadequate root system. Don't expect to see much growth above-ground the first season. After that, most trees will grow .5 to 1 inch in diameter and several inches in height each year. But, keep watering them whenever the soil is dry. A two-inch diameter tree will take two years before it can be expected to survive on its own without supplemental watering.
trial at UNH.
Your plant doesn't need added nitrogen fertilizer the first year, when it has little capacity to absorb nutrients. In fact, fertilizers containing soluble nutrients may inhibit root growth. Wait until the following spring and apply a slow-release fertilizer over the root zone, following soil test recommendations.
Don't do any major pruning at planting; only remove dead or injured branches or stems. Also identify what will become the dominant leader, or central trunk, on a deciduous tree and prune off competing leaders. Beginning the second year, prune during the dormant season as needed to establish good form and structure, especially on large-growing deciduous trees. How much pruning is needed will depend on how well the tree was trained in the nursery, but you should minimize pruning until the tree is well-established and vigorously growing in its new location.
Keep an eye out for damage caused by insects or diseases. Identify the pest and make informed decisions before applying any control measures. But remember, the key to getting your plant off to a good start is planting it properly and providing adequate water during the critical first year.
About the Author: Dr. Cathy Neal is an Extension Professor in the Dept. of Biological Sciences at UNH, state specialist in Landscape Horticulture for Cooperative Extension and a researcher with the NH Ag. Experiment
Station. Her program emphasizes using sustainable landscape practices that protect our natural resources.
Download the resource for the complete fact sheet.
Contact

