Why Compost:
There are many good reasons to make your own compost or participate in a community composting program. First, organic wastes (kitchen scraps) that are thrown into the trash end up in our local landfills. As organic matter decomposes in a landfill, under anaerobic conditions methane is released. Methane is a potent greenhouse gas, and can be explosive if not managed properly. Second, most solid waste facilities encourage home composting in the hope that you will divert that waste from the landfill, helping to slow the rate at which the landfill reaches capacity and has to close. Diverting wastes from landfills lowers our tax burden to maintain them. Lastly making compost for your yard and garden is great for the health of your plants and landscape and can be used in place of traditional wood mulch.
Compost is created when microorganisms (mostly bacteria) consume and break down organic wastes. When making a compost pile you are helping to create ideal conditions for those organisms to thrive and do the composting work for you. The bacteria needed for this are present everywhere, but if starting a fresh pile it may be helpful to inoculate or introduce some of these bacteria by putting in a few scoops of finished compost into the new pile. The heat generated in a compost pile is the byproduct of the bacteria. As bacteria eat the scraps, they turn the material into a deep brown color. You may also notice other organisms in the pile such as the fungi, Actinomycetes. This will look like a white spider web in the pile and is useful for breaking down complex organics such as cellulose, lignin, chitin, and proteins. You may also see ground beetles, sow bugs, centipedes, spiders, springtails and mites.

What to compost:
Most all organic wastes can be composted with a few considerations. Keep in mind if composting bulky material like tree branches or stumps you may need to shred them into a smaller size or wait a considerable length of time. In a small home-scale sized pile, bulky materials may take a long time to fully decompose.
DO Compost
- Kitchen scraps
- Cardboard
- Wood chips
- SawdustLawn trimmings
- LeavesStraw
DON’T Compost
- Pet waste or kitty litter - Can contain pathogens
- Bones - Will take a long time to decompose in a small pile
- Meat - Can attract animals
- Diseased plants & weeds that have gone to seed - Proper composting can kill nuisance pathogens and weed seeds, but it can be difficult to make sure every part of the pile reaches 150-160°F to adequately kill those pathogens. Prevent recontamination by avoiding these materials.
- Morning glory, buttercup, quack grass, comfrey - These plants can become a nuisance in the garden, and may be hard to kill without proper temperature.
Making the Pile:
An essential tenant of composting is getting the right brown to green ratio in the pile. Composting is most effective when there are 30 parts brown to every 1 part green. This ratio is on a weight basis, not volume. Brown represent materials high in carbon, like sawdust or straw, and green represents nitrogen rich materials like kitchen scraps and green grass. See table 2 for the C:N ratio of common organic wastes.

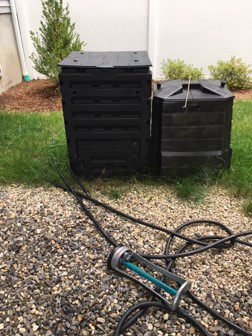
machine” commercial composting bin that sits on
top of the soil, with open bottom.
A pile made with 30 parts carbon and 1 part nitrogen will decompose more quickly and at a higher temper-ature than a pile made at 60:1 Carbon: Nitrogen ratio. A pile with too much green or nitrogen will often be smelly, and can attract nuisance animals.
It is best to stockpile brown material such as fall leaves, straw or sawdust near your compost pile. Each time you add kitchen scraps, you should top it with a healthy amount of brown materials. Keeping a pitchfork or shovel near the pile to blend in the materials each time you are there will help the pile stay active and well mixed. Layering the pile with brown then green then brown and so on is the best way to make an active pile.
Make sure to always top food scraps with brown material so as not to attract wildlife.
Size: the compost pile should be a minimum of one cubic yard, we recommend 3 feet wide by 3 feet tall, by 3 feet long. A pile that is too small will not generate enough heat to break down the materials. If making a large compost pile, a long and narrow pile will compost more efficiently than a tall and short pile. The size of the materials is also important. Materials small in size or diameter like grass clippings will break down quickly, while coarse materials like corn stalks create pore space to keep the pile aerated. Piles should contain a mix of course and fine materials.
Bin Types:
Three Bin: these systems allow for turning of compost on a regular basis, and is most appropriate for gardeners with a large volume of wastes to manage. These are typically made of wood and wire.
Commercial Composters: while these can be more expensive, they can be the most effective at keeping nuisance wildlife out of the pile. There are two main types, ones that are completely contained and can spin allowing for easy mixing of the pile, and ones that sit on the ground with an open bottom.
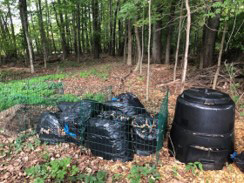
‘Low tech’ Composters: this system sits on the ground, where worms and other bugs can find the pile and assist in composting and can be made from found or recycled materials like old chicken wire and a few garden stakes. This system can be easily moved.
is above, and below is a unit that turns
on a wheel allowing for easy mixing of
materials.

What Went Wrong:
Pile is inactive, won’t break down: You likely don’t have enough green material, or the pile is too dry. Try adding materials like fresh green grass or kitchen scraps, and if the pile is dry try watering it. Make sure the pile is also well mixed. If this pile is brand new, adding a few scoops of finished compost will help inoculate the pile with beneficial bacteria and microorganisms.
Pile is wet/stinky: You’ve added too much kitchen scraps, and not enough yard debris (browns). Incorpo-rate more browns, make sure there is enough air space in the pile so that it can properly breathe and doesn’t become compact or anaerobic.
Using Compost:
Making sure it’s “finished”: Your compost will be “finished” in perhaps 6 months to 2 years depending on its size, materials and how often you mix it. Well-managed commercial composts might be finished in only 6-12 weeks. The finished product should be fine and light in nature. Moisture content should be around 40% moisture, in other words if you grab a handful of finished compost and squeeze it, it should feel damp but produce only a drop or two of liquid. If your finished product still contains coarse materials, you can screen the fine particles out with ¼ inch hardware cloth. Return the coarse materials back to the pile.
It is not a good idea to use unfinished compost in the garden. The material should be fully broken down before you put it in the garden. The pile should no longer be generating heat after it is turned. Adding “hot” compost to the garden could have adverse effects on your plants.
Compost should not be considered your primary source of garden nutrients. The nutrients in the compost will mostly be in the organic form, and therefore unavailable for plant uptake. They will become available slowly over time and should not replace your regular fertilizer routine. When adding compost to your yard or garden, you are improving the soil’s water and nutrient holding capacity, infiltration rate, porosity, and microbial diversity.
The following was taken from the 1993 King County, WA Master Recycler Composter Training Manual Edited and revised by Nancy E. Adams, University of New Hampshire Cooperative Extension:
Using Compost as Mulch
On flower and vegetable beds: Screen or pick through compost to remove large, woody materials. They are less attractive and will compete for nitrogen if mixed into the soil. Apply ½ to 1 inch of compost over the entire bed, or place in rings around each plant extending as far as the outermost leaves. Always keep mulches a few inches away from the base of the plant to prevent damage by pests and disease.
On lawns: Use screened commercial compost or sift homemade compost through a ½ inch or finer mesh. Mix with an equal amount of sand or sandy soil. Spread compost/and mix in 1/4 to ½ inch layers after thatching or coring, and before seeding.
On trees and shrubs: Remove sod from around trees and shrubs as far as branches spread. If this is impractical, remove sod in a circle a minimum of 4 feet in diameter around plants. Use coarse compost or material left after sifting. Remove only the largest branches and rocks.
For erosion control: Spread coarse compost, or materials left after sifting, in 2 to 4 inch deep layers over entire planting area or in rings extending to the dripline. Mulch exposed slopes or erosion prone areas with 2 to 4 inches of coarse compost.
For more information:
Let It Rot! by Stu Campbell
Compost Stew: An A to Z Recipe for the Earth by Mary McKenna Siddals
Contact

