Introduction
Site and soil
Establishing the vineyard
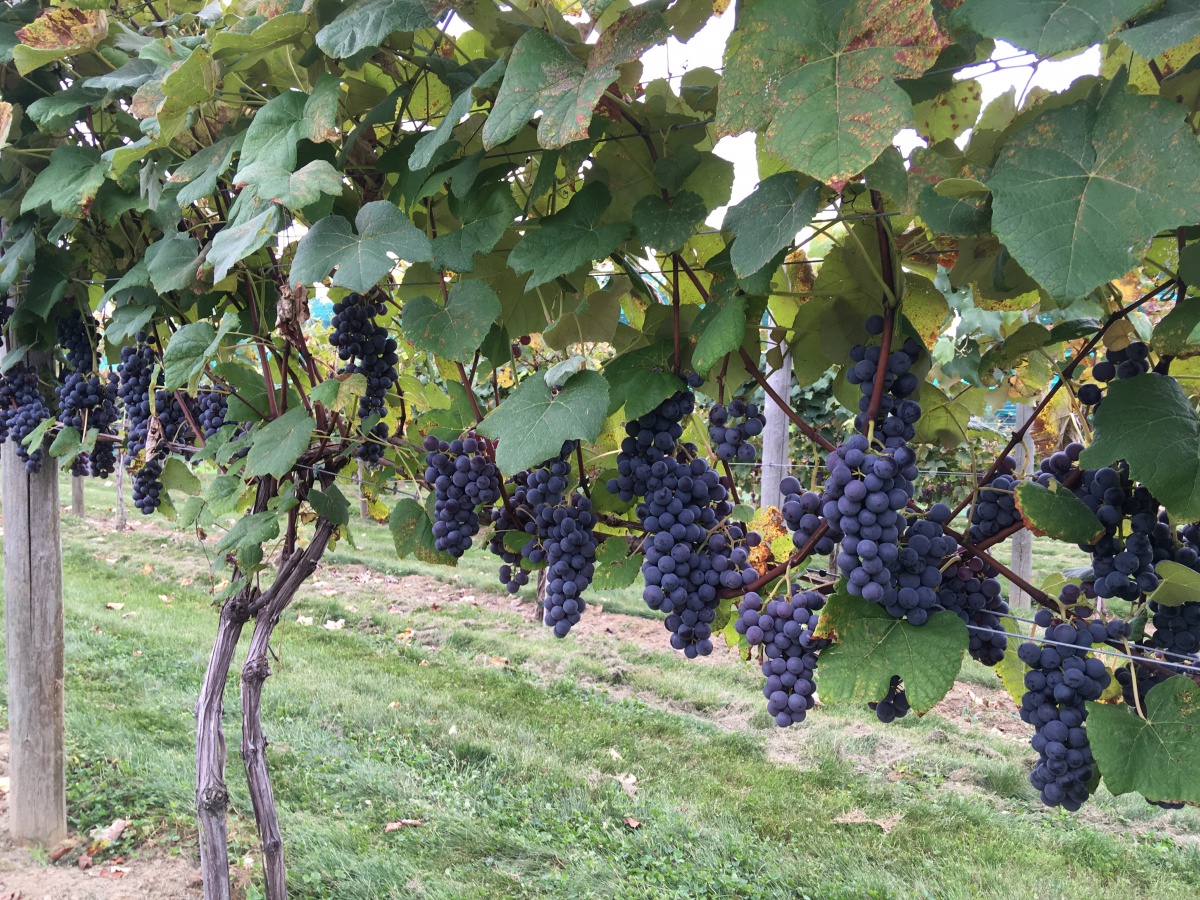
The grape trellis
Pruning and training
There are countless named pruning and training systems for grapes. See ‘Pruning and Training Grapes in the Home Vineyard’ for a detailed discussion of training systems suited for cold climate grape-growing.
In colder climates, cane-pruned systems are often better than cordon-pruned systems because they are less susceptible to winter injury. Of the cane-pruned systems, we’ll describe just one: the four-arm Kniffin. This system is well-adapted to vigorous and trailing varieties. It uses a two-wire trellis, as described above.
The planting year: Prune the newly set plant back to two strong buds. Allow all shoots to grow, and tie them loosely to a stake.
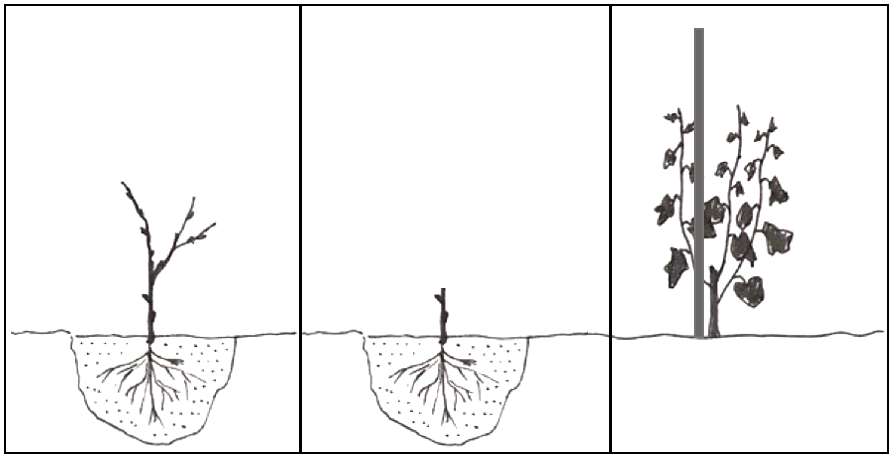
One year after planting: Prune back to 1 or 2 strong upright stems, which will become the trunk(s) (Figure 2).Having two trunks is insurance against winter injury. Tie one or both trunks to the top wire. If they are not long enough to tie to the top wire, tie to the bottom wire and extend a new shoot to the top wire the following spring.
Two years after planting: Select 4 vigorous canes for the arms. Select 2 for the top wire, and 2 for the bottom wire, as shown below. Choose canes that form just below the point where the wire and trunk meet. Prune each cane/arm to 10 buds in length and tie them loosely along the wires. For each of the 4 arms, a two-bud-long renewal spur should be left on the trunk to produce fruiting canes for the following season. Remove all other canes.
Each dormant season thereafter: Replace the arms with canes and leave new renewal spurs. This annual pruning will help ensure consistent production and high fruit quality and will keep the vines at a manageable size and shape.
Prune only in late winter or early spring, since early winter or fall pruning can promote winter damage. Vines pruned in late spring just prior to bud break will “bleed,” but this does not harm the vine. Fruiting canes should be tied to wires before buds begin to swell because buds are easily rubbed off once growth begins.

On the right, two years after planting, the two trunks have reached the top wire, and four canes/arms have been selected: two on the middle wire, and two on injured.
Managing the vineyard
Fertilizing grapes
In the planting year, apply 1/4 pound of 10-10-10 garden fertilizer (or its equivalent) by scattering it in an 18-inch circle around each plant 3 weeks after planting. Double this amount each year until year 3, when 1 pound of 10-10-10 (or its equivalent) is applied per year. Fertilizer should be applied in late April- early May.
Controlling weeds
Complete weed control around grape vines is essential to ensure adequate vine growth and high yields. Frequent shallow cultivation or hand-hoeing is the most common strategy. An organic mulch such as wood chips or sawdust will also help suppress weed growth and conserve soil moisture. However, mulches can also delay ripening of the grapes in the fall and may encourage rodents that can damage vines.
Harvesting
Do not harvest grapes until they are fully mature. Color is a poor index of maturity since many varieties change color long before they are fully ripe. Almost all varieties become sweeter and less acid as they mature.
Tasting an occasional grape is a good method of determining when grapes are ready. Another good maturity index is seed color, which changes from green to brown as grapes mature. The danger of fall frost, bird or raccoon pressure, or rot and cracked berries may force an early harvest in some seasons.
Insects and Diseases
Problems with several diseases and insects can cause excessive fruit and fruit quality losses in most years. This Pocket Guide for Grape IPM Scouting in the North Central and Eastern United States is a very useful resource that has photos of most grapevine problems. The most common problems in NH home vineyards are described, and shown in photos, below.
Insects
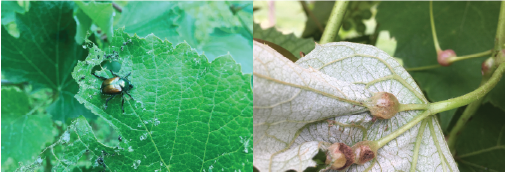
Japanese Beetle (Figure 3) – This beetle has one generation per year, and can cause severe defoliation of many plant species including grapevines during July and August. Management options include hand-removal and judicious use of labelled insecticides.
Hornets – Various hornets and wasps are attracted to cracked and overripe fruit, and can make harvest difficult.
Harvesting during the early morning in cool weather and before fruit crack or become overripe can minimize problems.
Phylloxera – A soft-bodied insect forms galls or protrusions on the underside of leaves; primarily with Vitis vinifera
varieties or hybrid cultivars. Remove affected leaves; chemical management is usually not warranted.
Tumid Gall Wasp (Figure 3) - The grape tumid gallmaker is a tiny midge (a type of fly) that lays eggs on developing leaves, stems and fruit clusters, causing galls that can interfere with fruit development and yield. The tiny larvae are found within the galls. Chemical management is usually not warranted.
Diseases
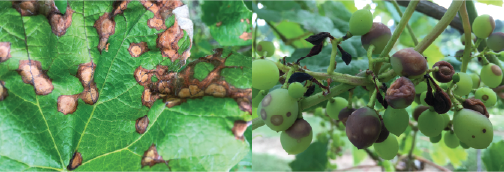
Black Rot (Figure 4) – The fungus that causes black rot causes leaf spots and fruit rot. Black rot is more likely to occur in wet years, and in plantings in partial shade.
Downy Mildew – This disease damages the leaves and canes, and occasionally the fruit. It usually appearing mid-summer if conditions are wet.
Powdery Mildew – This fungal disease affects leaves and fruit, and is favored by dry conditions.
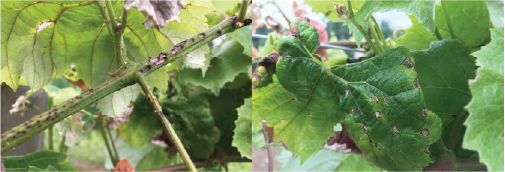
Anthracnose (Figure 5) and Phomopsis – These fungal diseases affect canes and leaves.
Varieties
Most grape cultivars are not hardy except in southern New Hampshire on sites where winter temperatures do not fall below -10 to -15 ° F. The varieties listed below should do well on good sites throughout southern New Hampshire, with those marked as “hardy” possibly tolerating winter temperatures down to -15 to -25°F. Some varieties contain seeds (“seeded”) where others are seedless. For varieties described as “Slipskin”, the skin readily separates from the pulp of the berry.

Contact

