
Many factors go into proper site selection for a greenhouse, such as slope, access and proximity to utilities. An important factor is how much sunlight makes it to the greenhouse, and how much is blocked by terrain, landscape and structures.
You can observe the sun’s path to see if your neighbor’s house or your favorite blue spruce tree will block the sun on any given day, but that will change throughout the year, unless you live near the equator.
A sun path chart shows the position of the sun at a specific location during different times of the year. Once oriented properly, the sun path chart can tell you when a tree, hill or building will cast a shadow on a potential greenhouse location.
A sun path chart also helps determine where to site a garden, solar panel or anything that requires sun exposure.
Once you’ve learned how to diagram a potential site, you should be able to assess any location in a few hours. This may seem like a lot of work, but it is much cheaper than building a greenhouse where it receives inadequate light, and much quicker than waiting all year to chart the shadows through the seasons.
Get a sun path chart for your location . Be sure to select “Plot hours in local standard time” for the chart to account for daylight savings.
How to read a sun path chart
A sun path chart is easy to read once you understand its orientation and relationship to the real world. Imagine yourself outside in a field, facing due south, like in figure 1.

The curved black lines represent the sun’s path at different times of the year. There are dates on these lines that show the sun’s path on that day. For example, on December 21, the sun follows the curve of the lowest line from left to right. On June 21, the sun follows the path of the highest line. Notice how much higher the sun is in the sky in June, and how much further it rises and sets in the east and west.
Why are only seven dates shown? The position of the sun in the first part of the year is the same as in the last half of the year. So each path represents two dates:
- May 21 = July 21
- April 20 = August 20
- March 20 = September 20
- February 20 = October 20
- January 21 = November 21
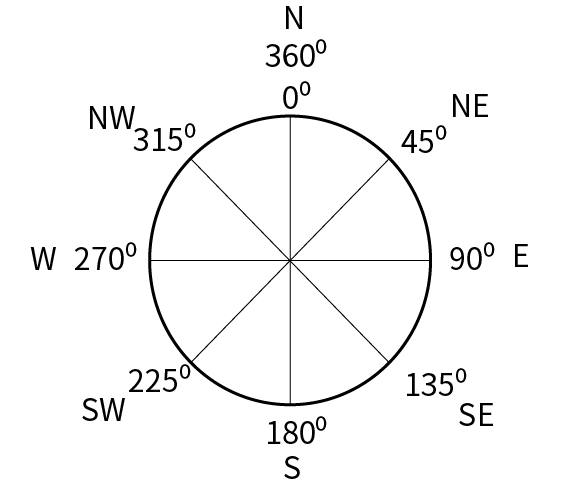
The red lines represent the time of day. The numbers on the bottom represent the direction relative to the planet, as shown in Figure 2, with 180⁰ being due south, 90⁰ is due east and 270⁰ is due west. North is at 0⁰ (or 360⁰), but the sun doesn’t shine from there in our hemisphere.
Now you can determine where the sun is at any point in time at this location. For example, if you want to know where the sun is on February 20 at 2 p.m., follow these steps:
1. Locate the black curve representing the sun’s path on February 20.
2. Locate the red line representing 2 p.m.
3. Mark the point where these lines touch (circled in orange in figure 3)
4. Draw a straight line down to the bottom and read the scale (shown in grey in in figure 3). It is approximately 215⁰. That’s close to southwest.
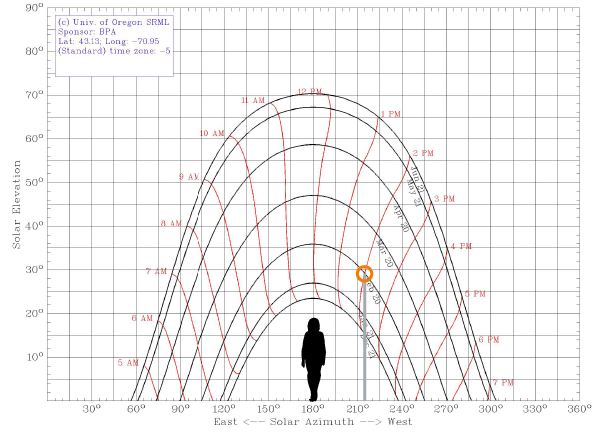
The sun path chart can also tell you is how high the sun is at any given time. By looking at the scale on the left of the chart, you can see the elevation, in degrees, above the horizon. 0 ⁰ is looking straight out at the horizon, while 90 ⁰ is looking straight up overhead. In our example of February 20 at 2 p.m., draw a line across the chart to the elevation scale (black line in figure 4). In this example the sun will be about 29⁰ above the horizon on February 20 at 2 p.m.

Using a sun path chart to determine what objects will shade a location
To help understand the concept, start with a simple object that will cast a thin shadow, like a flagpole. Figure 5 shows the front view looking south at a flagpole on the landscape and a top view overlaid with bearing angles. Image you are the viewer. Using a compass, smartphone and a sun path chart, you can determine when the flagpole will briefly cast a shadow on the location where you are standing.

How to use a compass to determine the bearing of an object
Study figure 6 to learn the parts of an orienteering compass.

1. Lay the compass flat in your hand and lift it up to your face.
2. Point the “direction of travel arrow” directly at the flag pole.
3. Rotate the “compass housing” until the “orienting arrow” lines up with the “magnetic needle”
4. Read the number at the “index line” to determine the bearing relative to magnetic north.
Adjusting magnetic north to determine true north
Unfortunately, magnetic north and true north are not in the same place. The sun rises and sets relative to true north, not magnetic north. You need to adjust for this difference, which is called declination.
The difference between the location of magnetic north and polar north changes based on location, so you need to look up the declination for your particular location. In Durham, N.H., the declination is negative 14.5 degrees. This means you need to add the declination to the magnetic compass bearing to get the bearing relative to true north.
In the United States, in general west of the Mississippi River is positive declination, meaning you need to subtract declination from magnetic north to determine true north.
If you spend a little more for your compass, you can get one that will adjust for declination. Follow the compass manufacturer’s instructions.
You may have a compass feature on your smartphone. Verify that the bearings reported are set to true north so that you will not need to adjust for declination.
Getting bearings on objects
In the example in figure 5, the magnetic bearing of the flagpole is 200⁰. Since this site is in Durham, N.H., add 14.5 ⁰ to get a true bearing of 214.5⁰.
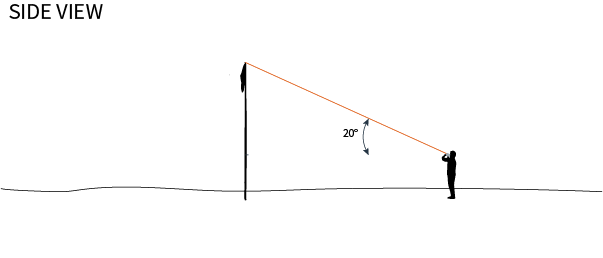
Defining angle of elevation
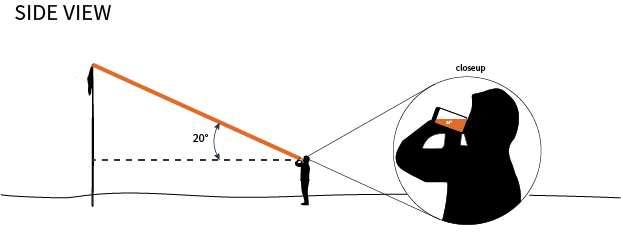
Next, you need to know how high up this flagpole goes. You don’t need to know the actual height, just the angle from the top of the flagpole to where you are standing. This is called the angle of elevation. Figure 7 shows the angle of elevation to the flagpole in the example is 20 ⁰ above the horizon.
There are few ways to determine the angle of elevation. One is to use clinometer to read this angle, but another is to use a smart phone.
How to use a smart phone to determine angle of elevation
Perhaps the easiest way to determine the angle of elevation is to use the level feature or a bubble level app on a smart phone . Figure 8 shows how a typical smartphone works as a level. You may need to download a level app to your phone.
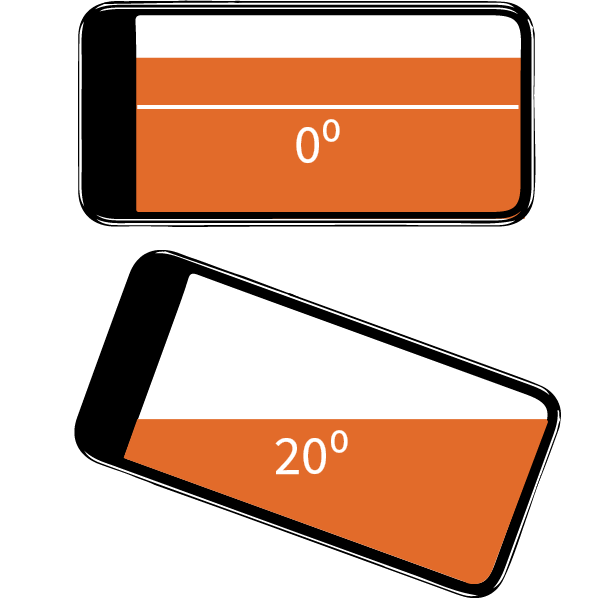
Facing the flagpole, sight along the top edge of your phone, and aim for the top of the flagpole. You will get an angle of elevation reading like in figure 9.
Since flagpole has a bearing 214.5 ⁰ and an angle of elevation of 20 ⁰, you can draw a line on the sun path chart, and start to get some real information!
Determining shade from a thin object on a sun path chart
The flagpole is at 214.5 ⁰, so find that spot on the bottom of the sun path chart, denoted as a blue X in figure 10. The angle of elevation of the top of the flagpole is 20 ⁰, so find that elevation on the side of the sun path chart and make a mark at this elevation line (green circle). This is the location and elevation of the flagpole, so sketch a flagpole between these points.
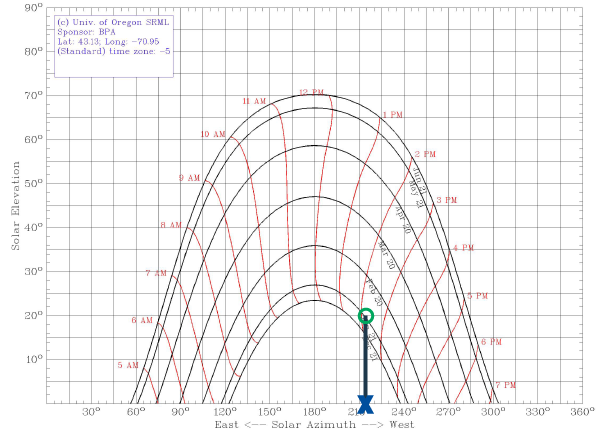
Now you can see when this flagpole will block the sun! The June path is always higher than the pole, so in June, it will never block the sun. In January, however, this is not the case. On January 21, the pole will be blocking the sun at about 2:15 p.m. Recall that on this chart, the January path and November path are the same, so the sun will be blocked again on November 21.
Determining shade from multiple wide objects on a sun path chart
Since most objects which will cast shade on a greenhouse are wider than a flagpole, and wider objects will create shade for longer time than narrow objects, it is critical to plot the width of objects south of your proposed greenhouse site to determine if the objects need to be removed or if you need to find a new site for your greenhouse.
Figure 11 shows a building and a tree to the south of a proposed greenhouse. For wide objects, the angle of elevation and bearing must be determined for each edge.
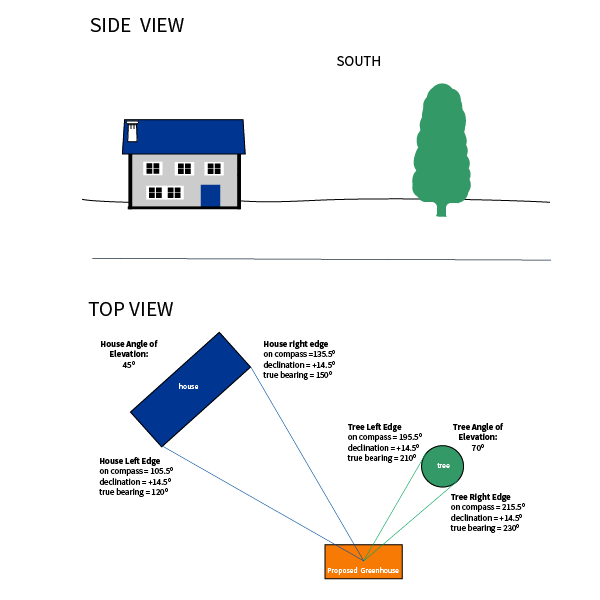
In figure 11, the tree appears taller than the house. Recall that you don’t actually need to measure the height, what’s important is the angle to the top of the object from the proposed greenhouse site, so near objects may appear taller than distant objects. An object which is closer, like the tree, may have an angle of elevation greater than that of a distant house, even though it may be shorter than the house.
Now that you have the elevation and bearings of these objects, you can plot the shade on a sun path chart. Plot the bearing and elevation of each side of each object just as you did for the flagpole in the earlier example. Your chart should look similar to figure 12.

You can now determine when the tree and the house will shade a greenhouse built at this location. Since the tree is always higher than the black curved lines, it will block the sun every day of the year, although the time of day it blocks the sun will change throughout the year.
For example, on January 21, the tree will block the sun from 1:50 p.m. until 3:05 p.m. (a total of 1.25 hours), but on June 21 it will block the sun from 12:40 p.m. until 1:05 p.m. (just 0.4 hours). The house, however, doesn’t block the sun at all between April 20 and August 20, but it will cast a shadow every morning for the rest of the year.
Now you are able to assess the suitability of this location for a greenhouse. Is a loss of light at the times shaded on the chart acceptable to you based on your crop schedule? In this example, if you would use your greenhouse from May to September, the shadow from the house will not pose a problem. If you are growing in this greenhouse in February, however, the house and tree will create a significant loss of available light.
Accounting for obects that span the entire horizon.
Depending on where you live, you may not be able to see the horizon from your location because trees and mountains may be blocking it. Find the angle of elevation of the tops of the trees or mountains, and draw that elevation straight across the chart before you start plotting anything else.
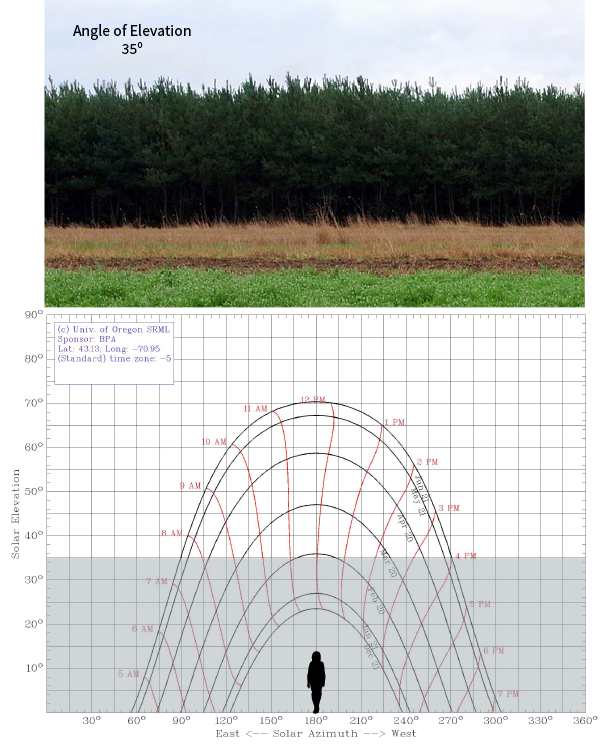
As you can see in figure 13, this tree line is quite close to the proposed greenhouse and will create significant shading problems. On March 20, the sun will not rise above the treeline until 9:15 and will set below the treeline at 2:30. From October 20 until February 20, the sun will never rise above the treeline in this location!
After you’ve charted your first location, this process should get much simpler, and a little time spent planning before construction can save you lots of hassle and money down the road!
Don't miss anything.
Extension Services & Tools That Help NH Farmers Grow

Newsletters: Choose from our many newsletters for production agriculture
Receive Pest Text Alerts - Text UNHIPM to (866) 645-7010
Contact
