
Grafting as a means of propagating fruit trees dates back several thousand years or more. Grafting is used for two principal reasons: most fruit trees don’t come true to seed (seeds from a McIntosh apple won’t grow into McIntosh trees) and cuttings don’t root easily. The technique of grafting is used to join a piece of vegetative wood (the scion) from a tree we wish to propagate to a rootstock.
Grafting is a fun way to get more enjoyment from your home orchard. You can use grafting to create trees with several varieties or to introduce new varieties into your home orchard. Grafting can also be used to change varieties of trees in your existing orchard (see Cleft Grafting, below).
Remember that you are almost always limited to grafting within a species... most apple varieties are compatible with each other as are most pears. You cannot graft an apple scion on a pear rootstock or vice versa.
Choice of rootstock
Today we have a wide range of rootstock choices that will produce trees of varying sizes, from full-size “standard” trees to true dwarfs (less than 10 feet tall at maturity). Different rootstocks vary not only in final tree size, but also in their winter hardiness, resistance to certain insects and diseases, and performance in various soil drainage types. Most dwarf rootstocks are also precocious, meaning that they bear fruit early in the tree’s life.
Rootstocks are propagated either by seed (for seedling rootstocks), or by the process of rooting cuttings, known as layering. Dwarfing rootstocks are usually rooted cuttings (Fig. 1). Several nurseries offer rootstocks in small quantities to home growers interested in grafting, and many nurseries offer fruit trees on a wide selection of rootstocks. Descriptions of some of the common apple rootstocks follow.
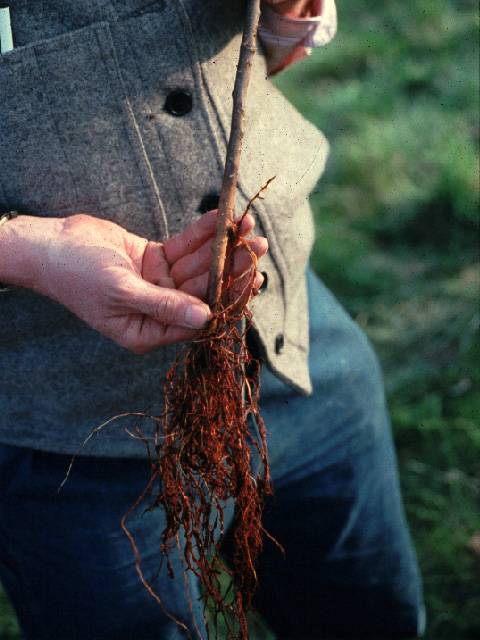
Figure 1: Rooted rootstock layer.
Seedling: Seedling rootstocks produce large trees that are very difficult to prune, harvest and manage for pests. Seedling rootstocks are not recommended for use in home gardens. Few home gardens have space for these large trees and the wait until first fruit will discourage most growers. In addition, pest control with these large trees is very difficult, usually requiring power equipment for spray application. However, these trees may have value when used for wildlife plantings. They cost less than trees with dwarfing rootstock and will grow rapidly, soon outgrowing the browse reach of deer if provided protection for just a few years
M.7 (Malling 7): M.7 was the dominant dwarfing rootstock in NH orchards for many years. It produces a semi-dwarf tree that reaches 15 feet in height and needs 15 feet of lateral space. Fruiting usually begins by the fifth year from planting. M.7 has some weaknesses, for example, it produces numerous root suckers that must be cut each year. On the positive side, M.7 is tolerant of collar rot, a major soil-borne disease of apple. Further, most varieties grafted on M.7 are very fruitful. Apple trees on M.7 should be staked to provide trunk support for the first four or five years.
M.26 (Malling 26): M.26 is an excellent apple rootstock for home gardens. It is precocious, often bearing some fruit as early as the year after planting. It is quite hardy and should do well in reasonably well-drained soils throughout NH. It produces very few root suckers. It needs support (preferably a stake that will last the life of the tree), and it produces fleshy root initials (called burr knots) on the above-ground portion of the rootstock. These burr knots are attractive to borers. M.26 is also susceptible to the bacterial disease fire blight. Plant the tree with the graft union only an inch or so above ground so less rootstock is exposed. Most varieties on M.26 can be planted at an 8-foot spacing.
Bud 9 (Budagovsky 9): This is the number one choice for NH home gardens if a fully dwarf tree is desired. This rootstock is productive, very precocious and when mature, trees on this rootstock stand only seven to eight feet tall. It should be staked to provide support for heavy crop loads. It is very hardy and should do well throughout NH. Apple trees on Bud 9 rootstock can be set at 7-foot spacing in the home orchard.
Selecting and Storing Scion Wood
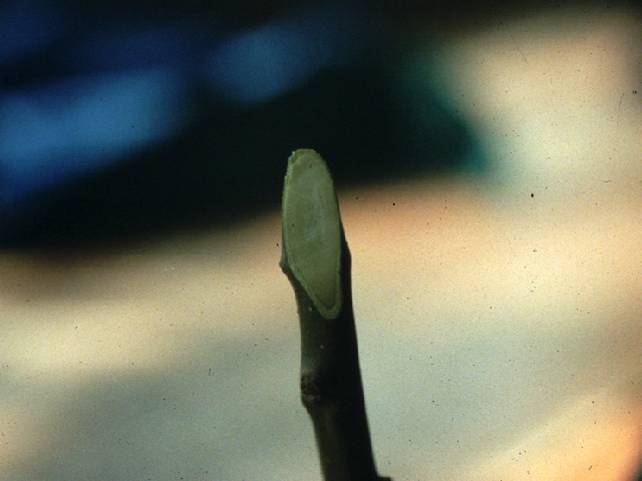
Several nurseries sell scion wood. Other sources of unique varieties are commercial orchardists in NH and other home fruit growers. Scion wood is collected while trees are still dormant (usually in late February or March in NH). Scion wood should be straight and smooth and about pencil thickness (Fig. 2). Water sprouts that grow upright in the center tops of trees are ideal.

Once cut, trim to 12-18” lengths, and place in a food-grade plastic bag. Place a damp paper towel or sphagnum moss in the bag to maintain moisture, seal, and place in the refrigerator until you are ready to graft, usually in mid- to late April.
Many newer varieties of apples and pears are patented. Propagation of patented varieties requires the permission of the patent holder along with a royalty fee for each new tree created.
Whip and Tongue or Bench Grafting
A technique commonly used for spring grafting is whip and tongue grafting, also known as bench grafting. Whip and tongue grafting can be used to add multiple varieties to an apple or pear tree already growing in the home orchard. Because this technique involves joining wood of equal or nearly equal diameter, generally about pencil thickness, whip and tongue grafting is done near the ends of branches.
To complete this graft, you will need a sharp knife and either grafting tape, masking tape, or a plastic strip to seal the graft. The first cut is a smooth cut approximately 1¼ to 1½ inch long, made with a single knife stroke (Fig. 3). This cut is made on the rootstock several inches above the top root. A matching cut is made on the bottom of a 5-6 inch long piece of scion wood.

The second cut is a bit more difficult to make. Start by holding the wood as shown in Fig. 4. Starting at a point about ⅓ inch down from the tip of the cut surface, cut down into the center of the rootstock. This cut should be nearly parallel to the grain of the wood (Fig. 4). The bottom of the scion should be prepared in exactly the same fashion as the top of the rootstock.
Join the two prepared pieces, scion and rootstock (Fig. 5). Push the two together firmly to insure a snug fit and good contact. Finally, wrap the new graft union to protect tissue from drying. Masking tape is one option. Another is specially developed grafting tape. (Fig. 6). I prefer to use 1 inch wide strips of plastic cut from bread bags. Start below the newly formed union, stretching the plastic slightly as you wrap around and up over the union. This will help insure a moisture proof seal. Once the union is completely covered, tie the plastic strip off with a simple knot. A healed whip and tongue graft is shown in Fig. 7.


Newly grafted trees are set out in a nursery row to grow. The home vegetable garden is an ideal place to grow these trees out for a year or two until they are large enough to plant out in their permanent location. When planting grafted trees, be sure to set the graft union 2” (Fig. 8) or so above ground to ensure that the scion does not root.

Cleft Grafting
Cleft grafting is a technique that produces a union between a large rootstock trunk or limb and a much smaller scion. Using this method, an older tree can be top-worked to change to a more desirable variety.
For this method, scion wood is collected and stored as described for whip and tongue grafting. Again, this grafting is done in April in NH.
The first step in cleft grafting is to prepare the older tree for top-working. The tree is cut off at a convenient height, usually 30 inches or so above ground (Fig. 9). Alternatively, individual branches within an older tree can be top-worked using this same technique.

Using a hammer and either a cleft grafting tool designed for this use or alternatively, a hatchet or chisel, a split or cleft is made in the wood (Fig. 10). This cleft is then held open using the end of the cleft grafting tool designed for that purpose, or a screw driver or similar tool (Fig. 11).


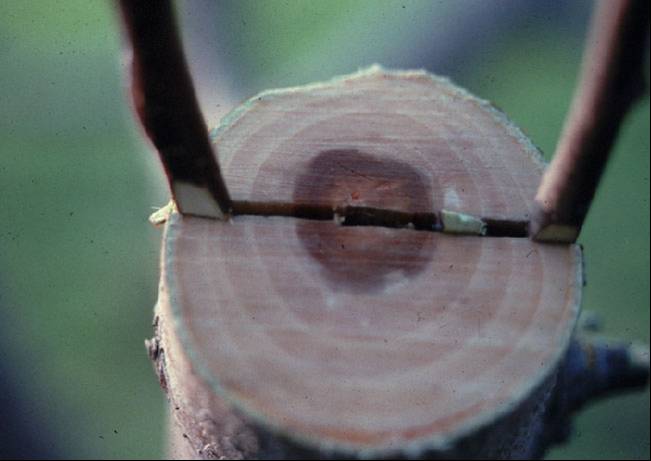
Once the stock is prepared, scions are cut and inserted to complete the graft. Two scions are prepared using pieces of pencil-thick, year old wood, approximately five to six inches long. The bottom of each scion is prepared by making a single, smooth, sloped cut on each side (Fig. 12).

These scions are set into the cleft, one on each side, positioned so that the cambial zones of the stock and scion ‘line up’ or touch (Figs. 13, 14 and 15). It is important to note that the bark of the stock is much thicker than that of the scion. The key is to line up the cambial zones, not the outside edge of the bark of each.


If the stock is larger than four or five inches in diameter, I like to insert additional scions using a technique called inlay or bark grafting. Scions are prepared as shown in Fig. 16. Again, a four to five inch scion is used. A one-inch long cut is made up the middle of the scion from the bottom, and one side is removed. The other side is often tapered at the tip to make joining the scion to the stock easier.

Place the flat, cut surface of the scion flat against the stock and trace the sides into the bark of the scion with a knife. Then cut the bark in all the way to the hardwood using the tracings as a guide. Carefully peel back the bark and slide the scion in until it seats (Fig. 17). Using the bark flap as a cushion, nail the scion in place using a wide headed, wire nail (Fig. 18).


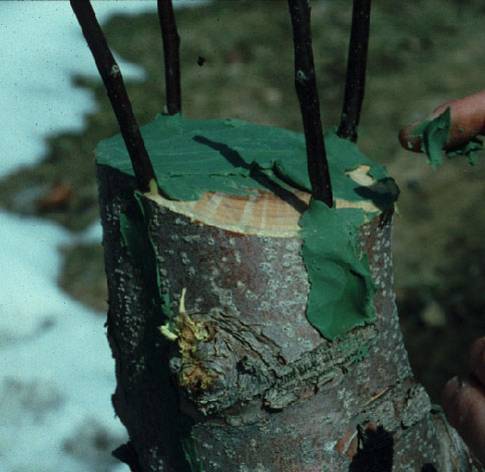
Insert scions up to every four inches in stock circumference. After a scion has been placed in each side of the cleft and inlay grafts have been added, all cut surfaces must be covered to prevent drying of sensitive cambial tissue. Use a commercially available grafting compound for this purpose. Check newly made grafts for several days to insure that no holes in the grafting compound have opened (Fig. 19).
What Comes Next?
If the grafts were made correctly, most will grow, some quite vigorously. These grafts will be brittle for a few years, so proper training is important.
The spring following grafting, select two successful grafts and join them together by wrapping the weaker one into the stronger one and tying it off with black plastic electrical tape. Over time, these wrapped shoots will graft together and create a very strong, natural bridge (Fig. 20).

Finally
Proper tools and supplies make the grafting job easier. There are several good grafting compounds on the market. Those that do not need heating are easier to use. While a hatchet can be used to make cleft grafts, a cleft grafting tool is relatively inexpensive and makes the job easier. Lastly, A sharp knife is your most important grafting tool and it makes sense to purchase a high quality one.
Fact sheet written by William G. Lord, UNH Extension Fruit Specialist, Emeritus and Amy Ouellette, Agricultural Resources Educator Updated and revised March 2017 by Becky Sideman, UNH Cooperative Extension Professor & Specialist
Extension Services & Tools That Help NH Farmers Grow

Newsletters: Choose from our many newsletters for production agriculture
Receive Pest Text Alerts - Text UNHIPM to (866) 645-7010