How to Start Seeds Successfully Indoors [audio]
Show Notes
If you aren’t starting seeds, you’re limited to whatever you can plant directly into the garden and whatever starts you can pick up from your local garden center. Starting your own seeds opens up possibilities for growing new crops you couldn’t grow otherwise, better varieties for your garden and tastes, and earlier and better harvests to make it all worth it. In this episode of Granite State Gardening, UNH Extension’s Emma Erler and Nate Bernitz share proven tips and solutions for successfully starting your seeds indoors, from set up and germination to transplanting. Come for the accessible science, stay for the demystifying banter. Once you learn how to start seeds indoors, you can take your gardening to the next level.
Featured Question: Homemade seed starting and transplant media
Featured Plant: Hyacinth Bean (Lablab purpureus)
Gardening Tip: Planting Depth
Background Reading:
Starting Plants From Seed [fact sheet]
Growing Vegetables: When to Plant Your Vegetable Garden [fact sheet]
Growing Seedlings Under Lights [fact sheet
Connect with us at @askunhextension on Facebook, Instagram and Twitter and subscribe to the monthly Granite State Gardening newsletter.
Email us questions, suggestions and feedback at gsg.pod@unh.edu
Transcript by Otter.ai
Nate Bernitz 0:00
Welcome to the Granite State Gardening podcast from UNH Cooperative Extension. On today's show, we're talking about starting seeds indoors. In the show notes, you'll find a link to our fact sheet on seed starting, as well as helpful resources on when to start your seeds, indoor lighting and more. Eight episodes in we're having a blast putting this podcast together and want to hear from you with your feedback, topic suggestions and gardening questions. Our email is gsg.pod@unh.edu. We really appreciate the emails we've gotten so far. And hey, if you're not already connected with us on social media, we're on Facebook and Instagram. Just search for Ask UNH Extension. Now let's get started with seed starting.
Greetings Granite State gardeners. I'm Nate Bernitz, co host with Emma Erler of the Granite State Gardening podcast, a production of UNH Extension. Today we're talking about seed starting, a practice that opens so many possibilities for gardeners, especially somewhere with a relatively short growing season like New Hampshire. By starting seeds, you won't rely on just whatever seedlings you can get your hands on from local garden centers and plant sales. And you won't be limited to what can be sown directly in the garden. You'll have your choice of crops, flowers, and varieties galore to choose from all because you'll be able to provide ideal germination conditions indoors. Once you learn the science and know-how of seed starting, you'll be at a whole other level of gardening and won't believe how limited you once were. With spring rapidly and mercifully approaching, despite what Punxsutawney Phil says, there's no time to waste. So let's get started.
Emma, when it comes to seed starting, I want to first know the science, we always want to know the science first. So what are those ideal conditions for germinating seeds?
Emma E 2:05
Well, a seed is is basically a shell or husk that's holding an embryo on the inside. And in order for a seed to germinate, you need to have some specific conditions. You need to have moisture, you need to have light, and you need to have oxygen. If you don't have those things, then the seeds are not going to germinate. When we're talking about germinating seeds at home, we are providing at least moisture and oxygen in our seed starting mix that we're using. So that's that potting media that we've chosen to start our seeds in. And then light that's either going to be coming from a really bright window, or ideally actually from some sort of supplemental lighting system that you have inside your home.
Nate Bernitz 2:59
Okay, so moisture, oxygen and light, not nutrients because these seeds already have the nutrients they need to at least get started, so to speak. So ideally, we're recreating these really ideal germination conditions indoors. We know the science, it's been researched, it's been determined, this is what you want to do for these seeds. So if you're doing everything right, what kind of germination percentages are you expecting, like for every 100 seeds you're trying to start? Are all of them going to germinate? And what sort of practices that maybe aren't so ideal might bring that germination rate down?
Emma E 3:40
Wow, that's a really good question. And honestly, it depends a lot on the exact plant that you're trying to propagate. Not all plants create viable seeds equally. Some produce a lot more viable seeds than others. So germination rates are going to vary a fair amount, and it's going to depend a bit too on the age of that seed, exactly how it was harvested, and how it was stored. If you're buying seeds and packets like most of us do, those seed packets will have been germination tested by the Seed Company. And on that packet you'll see a percentage stamped on there somewhere that indicates what the germination percentage of that seed should be under ideal conditions. It's interesting though, because like I said, some plants do have a lot of really viable seeds. If we're looking at something outdoors, let's say an invasive plant like oriental bittersweet, the germination percentage of those seeds tends to be well over 90%. Whereas something like a paperbark maple, it's really only about 5%. So it helps to know a little bit about the seed that you're starting. But if you have brand new seeds in a packet, you really just need to pay attention to what that percentage is listed on that packet and know that really, it would be very rare to have absolutely every seed germinate for you, that typically doesn't happen. But if you have some good quality seed, at least 80%, I think would be acceptable.
Nate Bernitz 5:17
Okay, folks, don't go out there and just start germinating oriental bittersweet seeds because they're good germination! They're invasive, don't do it. When I go to the store, really any store right now, there are seed starting kits everywhere. They're pretty cheap. They claim that this is what you need. But I want to know from you, what do you actually need in terms of supplies, equipment, what kind of setup is really essential to get to get started and be successful with seed starting?
Emma E 5:53
It could definitely be handy to buy one of those complete kits, but you're right, you don't need it. To start with, I think it's helpful to figure out what sort of containers you want to start your seeds in. Seed-starting containers are typically on the smaller side, because you don't need to have a whole lot of potting media for a small seedling's root system. They also are going to have drainage of some sort in them. Just like you would for any other potted plants, you need to have drainage for your seed-starting containers. Purchase options might include plastic cell packs, or if you're looking to start something that really doesn't like its roots disturbed, you might go with a biodegradable container, like a peat pot or cow pot. Or if you really don't want to spend money at all, you might have enough materials at home that could work as seed-starting containers. Some people like to use egg cartons. I've seen the bottoms of milk jugs and soda bottles used for seed starting, or even yogurt cups. But what you need to do if you're going to use containers like that is punch some drainage holes in the bottom so that excess water can escape. Once you have your containers figured out, then you're going to need to get yourself a really good high quality seed-starting mix. A seed-starting mix is going to be soil less. That means it's composed of peat moss and probably some very fine vermiculite and perlite. These are both volcanic materials that are often added to potting mix to improve drainage and moisture holding capacity. But you can buy bags of product that specifically are called seed-starting mix. These are really important for very fine small seeds, using just a regular potting mix will work just fine for larger seeds. But I found that I have much better success for small seeds with that that finer specific seed-starting mix. Once you have those two things, that's the absolute bare minimum, you should probably also be thinking about getting together some sort of lighting system. For most of us, we don't have a greenhouse attached to our home where we're going to have enough natural light to be able to grow seedlings effectively. So we'll need to have some sort of supplemental light. It can also be really helpful to have a heat mat, an electric heat mat that you put underneath those seedlings to help improve germination. Because usually, most of us aren't keeping our homes quite warm enough for optimal seed germination. But if we're able to just heat up the soil that can be really helpful.
Nate Bernitz 8:44
One thing I would add that's really simple would be some sort of tray to go underneath your pots to collect water. And if you're buying those cells, and by cells you just mean a bunch of little pots kind of fused together that may come with some sort of drainage tray. A lot of people I see will have these kind of shelving system where it goes like drainage tray, pots, plants, and then a lighting system kind of above that hanging from the shelf. And rinse and repeat, going up to three, four shelves. Those work pretty well. It's interesting though, I was just at a random store and I saw seed-starting kits that were labeled as being window. So what do you make of seed starting? A really simple way is just putting it in a bright window. So it's not a greenhouse and you don't have a lighting system? You're just putting it in a window. That sounds really great. I assume you can probably get plants to germinate, but are you going to be able to give them the really ideal conditions they need with just natural light that way?
Emma E 9:58
Yeah, I'm glad you asked. That. So you can absolutely get seeds to germinate. No problem just in a window. Actually, for a lot of seeds light isn't necessary, really at all, for germination. It's what comes after the growth after that seed has germinated. That is important. And this is really where the light comes in. A lot of times with just using a window cell, the plants aren't getting enough light. And when when this happens, what you'll usually see is extremely long, extended stems on those seedlings. So they might be very weak, they might be really bent as they're trying to grow towards the window. And basically, what you're producing is a very low quality transplant, I think it gets a little bit easier to produce seedlings just using a window the later or closer to planting time you go once once the length is longer, but if you're trying to start things, let's say in late February or early March, those plants are going to need a whole lot of light, and you're gonna need to keep things indoors for a long time. It's probably not going to work all that well, just using the windowsill. But you can certainly try experimenting in your own home to see if perhaps the plants that you're trying to grow will tolerate that sort of lighting scenario.
Nate Bernitz 11:28
So when you talk about potentially starting something in late February or March, would that be our category of cool season crops? Maybe you're starting broccoli or something like that, that you're actually going to be able to start growing outside pretty early in the spring. What's your thought on what you might be starting as early as late February, early March?
Emma E 11:48
Definitely some of those those cool season crops. Onions can take a really long time if you're growing them from seed. So those you'd start early, and also some of the annual flowers that are a little bit trickier. Let's say you're trying to start your own begonias from seed, those can take a really long time to grow from seed into a plant that's actually large enough and worth the effort to plant outside.
Nate Bernitz 12:14
So are there charts or something that you can use to kind of figure all this stuff out? It sounds kind of overwhelming to me like, okay, every single flower, every single vegetable like needs to be what started at a different time? How do you figure this stuff out?
Emma E 12:27
There are charts out there. And actually, UNH Extension does have a chart for vegetable seedlings. We don't have one for flowers, though. What I find most helpful is to create my own chart, once I have my seeds in hand. So I have all my seed packets, and I'll go through and create a table and list exactly when I need to start each based on the last reasonable frost date for my area or the last likely frost date. And it's going to vary from year to year. It's going to vary based on the crop that you're trying to grow. In general, for let's say broccoli or cauliflower, you're probably only going to start that, if you're trying to just plant in the spring, maybe four to six weeks before you transplant out into the garden. But other things like those onions, those could take as much as eight to 10 weeks. So once once you start seeds it's kind of a process that just keeps rolling along through the spring. You don't do it all at once. Or if you're doing it in the best possible way, it's more of a tapered process.
Nate Bernitz 13:39
Interesting. Are you starting all of your broccoli all at once? Or are you successionally starting individual crops?
Emma E 13:49
Usually with seed starting for spring planting, I'll plant everything. If I was growing multiple types of broccoli, I would plant all of my broccoli seeds at once. If I was hoping for sustained harvest I'd probably be planting another round of seeds later on, actually in the summer, so that I could have some plants to put in the ground for a fall harvest.
Nate Bernitz 14:15
I see. So successional planting might be more associated with plants that you're direct sowing, like your leafy greens or kind of fast growing plants.
Emma E 14:26
Often, yeah, leafy greens, root vegetables. You could do some successional planning with perhaps broccoli, but a lot of other crops are going to be in the garden for the long haul. So your tomatoes, for example. Beans. You usually you don't start beans indoors usually direct but you might have a couple harvests there.
Nate Bernitz 14:49
Oh, I'm glad you brought that up. So what plants would you and would you not start indoors and how do you figure that out?
Emma E 14:56
Well, it depends again on what sort of infrastructure you have to actually start seeds indoors. Most vegetable plants can be started directly in the garden. So you don't need to be starting things inside at all. The benefit of starting plants indoors though, is that you really get a jump on the season. And because our growing season tends to be on the shorter side in New Hampshire, having plants that already good size to put out in the garden as soon as growing conditions are appropriate for them to be outdoors, helps you get a better harvest. Things that I would definitely think about starting indoors would be some of the warm season crops like tomatoes, eggplants, and peppers. I would probably also be starting so my brassicas, so the broccoli, like we mentioned, kale, maybe cauliflower, and Brussels sprouts. What I wouldn't spend too much time on would be most of the root vegetables - carrots, beets, leeks. The main reason for that is because for me, I've found that they're very difficult to transplant without damaging them, especially carrots. If you damage that root on a carrot when you're transplanting, a lot of times the carrot will fork in multiple directions. So you'll end up with a very odd looking carrot, as opposed to that that nice straight route that you're expecting.
Nate Bernitz 16:28
Would your seed packet or seed catalog say one way or the other? Will it say whether you should start it indoors or sow it outside directly?
Emma E 16:35
It definitely well. For a lot of crops, you'll notice that there are two different options. There's instructions for starting indoors, and they'll be instructions for starting outdoors. For a lot of annual flowers, a lot of those are going to be start indoors only. Although there are some that can be started indoors or outdoors. It just depends a little bit more. But check your seed packet, that information is going to be there.
Nate Bernitz 17:03
I guess the logic for starting something like a tomato indoors is that to germinate outside you'd have to wait until the soil is already pretty warm. So you're just losing valuable growing time. It doesn't need to be outdoors germinating, when when it could be already in the ground. Would you potentially put a seed in the ground for a tomato at the same time that you would actually be transplanting out something that you already started?
Emma E 17:36
That's exactly right. So if that tomato did mature to the point to produce fruit, it's probably getting close to the end of the growing season. Whereas if you had planted that indoors and transplanted out a decent size seedling plant, then you could be getting fruit by mid summer. So yeah, it makes a big difference from the time that you start a seed to the time that you're transplanting it.
Nate Bernitz
Is that like a month long process or shorter? Or does it depend?
Emma E 18:06
It depends again. Plants grow at different rates. For a tomato, usually you're looking at no more than six to eight weeks before you're going to transplant outdoors. But for other things, it's going to be even shorter. For cucumbers, you're probably not going to start those indoors more than a month before you're going to plant them outdoors. And I should also say that there are some plants that just don't transplant well. Those are pretty much always better planted directly in the garden. Squashes and cucumbers fall in this category. You can start them indoors, but if you do, you want to be really careful to avoid disturbing the roots when you go to plant. So that's where using one of those biodegradable peat pots or maybe a pot made out of newspaper or something is good. And the same I found goes for peas and beans. They germinate readily in the garden once the soil is warm enough so there's there's no sense in doing it inside.
Nate Bernitz 19:05
If you're using those plastic cells, you have to kind of squeeze the bottom to get it loose. And that disturbs the root since you're saying that's okay with something like a tomato but not for a squash.
Emma E 19:16
Exactly.
Nate Bernitz 19:17
Yep, got it. Going back to the potting media as you called it or seed-starting mix. I see three options. One of them is to buy a premade seed-starting mix. You're buying a bag and it says its seed-starting mix. I've seen those vary really widely in price and ingredients too. You can also buy these pellets that you essentially just add water to. I've seen those a lot and you can also make it yourself so you could buy the individual ingredients like you were talking about. What's your take on it? Do you prefer one method over the other? I mean, why not just buy the pre-mixed bag. That seems like the easiest way to go.
Emma E 20:01
That's usually the way I go, just because it is easier. If you're trying to make a mix yourself, usually those individual components come in such large quantities that you're going to be left with trying to store a huge bale of peat moss or vermiculite, perlite, all those materials as opposed to just having a bag that comes with those things already mixed up in a good ratio. So I think it's worthwhile just getting the the premix. But of course if you if you really want to dabble and try to make specific seed-starting mixes depending on what you're growing, and that might make a difference if you're if you're growing really fussy plants from seed, but most of the seed-starting mixes are going to work just fine. Those peat pellets that you mentioned before, those work really nicely as well. Those are also good for plants that you don't want to disturb the root system of. I often don't use them just because they're a little bit more expensive, but they're absolutely a viable option.
What is the best soil mix for starting seeds? That's this episode's featured question. By and large, you'll have best luck starting plants from seed if you use a seed-starting mix. Soilless seed-starting mixes have a fine texture and are made of peat moss, perlite, coconut coir, fiber, and vermiculite. Different brands will have different ratios of these ingredients, but the best products will typically contain about 50% peat moss and 50% fine vermiculite or fine perlite. Pasteurized compost may also be a component of some seed-starting mixes, but it isn't absolutely necessary. Gardeners who make their own seed-starting mix may be interested in incorporating compost to cut down on the amount of pea enquire they have to use because both of these have environmental consequences. The tricky part of using compost though, is making sure it is free of weed seeds, insects and diseases. Eventually, your seedlings may need to be transplanted into bigger containers. When that happens, you can switch to using a general potting mix. Potting mixes are different from seed-starting mixes in that they have a coarser texture and often contain fertilizer, something that larger plants need, but seedlings really don't. Potting mixes are often a little less expensive than seed-starting mixes, and can be purchased in larger quantities. They can be used for a larger number of purposes like potting up your house plants. Regular potting mixes can be used for seed starting to, but they work best for large seeds. Very small seeds may not germinate as well in coarser mixes, because the seeds won't have good contact with the media. A regular potting mix will work just fine for very large seeds like cucumbers or squash. You'll probably have better luck with a seed-starting mix for most other veggies and flowers. So pick up a package of seed-starting mix for your seed-starting ventures this spring and have fun planting.
Nate Bernitz 23:36
Okay, so in terms of where you're going to be starting your seeds, so obviously indoors, but is the room temperature important? I knowthe mix temperature is important because you mentioned that warming mat earlier, but is this something you can do in a cooler basement or garage or something like that? Where does it really need to be in your home that you're keeping warm enough for you?
Emma E 24:01
For most seeds, what's going to be more important is actually that soil temperature. So rather than having the air be really warm, having the soil be warm is key. And so for a large number of seeds, the ideal germination temperature is going to be something like 75, maybe even 80 degrees and most of us aren't going to be keeping our homes quite that warm. So in order to get the soil at least to that ideal temperature, putting a heat map beneath them is important. Once the seed does germinate, though, it is important that the air temperature isn't too cold because if it is too cold, just like with house plants, you can see some damage to foliage. I wouldn't try starting seeds in a room that's cooler than 50 degrees, which for most of us there should be a place in our home that's at least 50 degrees. If you're using a heat mat that should be perfectly fine. But it's also okay if your home is warmer. If you don't use a heat mat, it's not the end of the world. It might just take seedlings a little bit longer to germinate. And you might have a slightly lower germination percentage. But let's say you do keep the inside of your home 70 degrees, then perhaps the heat mat is unnecessary. But if you are trying to start them in a slightly cooler environment then that heating mat is is really important.
Nate Bernitz 25:34
Is there any benefit to using a humidity dome, like creating a mini greenhouse?
Emma E 25:40
Definitely. When you're trying to get seeds to germinate and when seedlings are really small, keeping the humidity up around them is important. I think one of the number one reasons for this is that that potting media will dry out really quickly if you just have that media open to the air and low humidity conditions in your home. Seedlings do need consistent moisture. So both seeds to germinate need consistent moisture and very, very small seedlings need consistent moisture in order to survive. So if you have a plastic covering or a dome lid that you can put on a tray, that will help you keep the humidity up in that little environment around those seedlings so that you don't have to be watering constantly. Because most of us aren't going to be around to hit the soil with a spray bottle every hour or whatever it takes to keep it evenly moist.
Nate Bernitz 26:39
Is an alternative to a humidity dome just watering more often?
Emma E 26:43
Potentially, yeah. I still think you're going to have better luck if you do put a cover over the top. But it's not absolutely necessary, you can certainly get a lot of things to start just with ambient indoor conditions, as long as you aren't letting that that soil mix get totally dry. You just don't want that mix to get soggy either.
Nate Bernitz 27:07
So when you actually get started, do you moisten or get the mix wet before you even put the seeds in?
Emma E 27:13
You do. You want that mix to be pre-moistened before you sow the seeds. What I typically do if I have a brand new bag of potting mix is take them out in a bucket or a bowl, something I'm going to use to fill containers with, and put in just enough water in it that it's moist. But if I if I grab it and squeeze some in my hand, the water's not going to drip out of it, I'm not going to be able to wring it out, that's going to be just about perfect. I'll fill up my containers, I'll plant my seeds. You do want good soil contact with those seeds. So watering a little bit after you've planted can be helpful, but you don't want to drown them. So that's where a spray bottle can come in handy. Or a misting function on a hose. Because if you if you're using just a watering can, or going directly under the faucet, you're going to wash those seeds all around, and they're not going to stay where you planted them. That's that's probably the biggest concern.
Nate Bernitz 28:19
And planting depth is actually pretty important, right?
Emma E 28:22
Very important. Some seeds require light in order to germinate. So they've actually adapted to basically germinate just on the soil surface, where others actually germinate better if there's a covering of soil. So if they are kept in the dark.
Nate Bernitz 28:39
I see, well, and let's talk just a little bit more about planting technique because you just kind of rolled over that you're like you plant your seeds. How do you do that? I know, one issue I've had is seeds vary dramatically in size, and I struggle to manage and handle the really small seeds.
Emma E 28:58
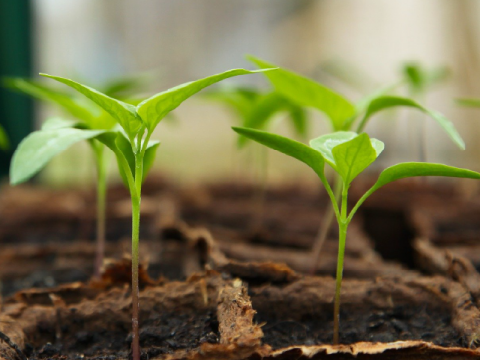
Really small seeds can be really difficult. There are some tools out there for planting individual seeds, basically little vials and such that will allow you to just release a single seed at a time. But often what's easier if you're dealing with a really small seed is to plant more like a tray of those seedlings and then transplant them into other containers later on with a larger seed that you can actually pick up individually with your fingers, rather than planting individual seeds in a container works just fine. And I always defer to whatever the depth recommendation is on the seed packet. It's pretty common for seeds to be buried a quarter of an inch to an eighth of an inch. Very large seeds might be buried about half an inch. And if something says it needs light to germinate, then that basically means you're just sprinkling it on the soil surface. Maybe putting a fine dusting of seed starting mix over the top, but you want that to be open so that it's getting plenty of light. Seeds need that.
Nate Bernitz 30:05
Is the amount of light important there, like you actually need to turn on your grow lights to get them to germinate or adjust them to being on the surface and getting some ambient room light? Is that enough?
Emma E 30:16
I'd either have them under your grow lights, or have them set up in a windowsill just to get them going. Because they are they're going to need some some actual , real light exposure. As far as I know, I've never tried growing seeds that need light in an interior room without any light source.
Nate Bernitz 30:34
Is it just one seed per pot, or does it depend on the crop? Is it okay if you accidentally drop a few seeds into a pot?
Emma E 30:45
It depends on the crop a bit. I will usually plant at least two seeds in a pot, just because you know that the germination percentage is never going to be 100%. If you're looking at that that packet you have and it says maybe 75%, that means that you know every fourth container that you plant, it's likely that a seed isn't going to germinate. So if you put two in there, then chances are pretty good you're gonna get something. Then all you need to do if you have more than you need is just thin out the extra. So you just have at the end one plant growing in that pot. And with very, very small fine seeds, like I said, it can be easier to plant a whole bunch of those in a container. Then as they get bigger and develop their first set of true leaves. So when seedlings first come up, they have what are called their seed leaves, which pretty much look the same on every plant. But once that next set of leaves comes out, or better yet, the second set of true leaves comes out, then you can transplant those into individual containers.
Nate Bernitz 31:51
Okay, I see. That's really interesting, I didn't realize that you're potentially having to transplant before you transplant.
Emma E 31:59
You can. The other alternative with very, very small seeds would just be to try to plant as few as you possibly can in one container, and then thinning them out within said container. But I find it's perhaps a little less wasteful, if you just plant in a larger container and then take those seedlings out to grow them out a little bit further. You could do the same thing, basically with any seedling. But with larger size seeds, where it's easy enough to pick up an individual seed, I think it's easier to just plant them directly in the container you want them to be in.
Nate Bernitz 32:35
I see. And for those larger seeds where you're planting a single seed, it germinates it, are you ever gonna have to transplant that up to a larger pot before transplanting it outside? Or are you pretty much planting it in the same little pot that it's going to be and until it goes out to your garden?
Emma E 32:53
I guess that depends a bit on when you've started your seeds and when you're actually able to get things outside in the garden. Ideally, you're not going to have to put that extra labor in of moving plants from the seed-starting pot into a larger size pot. But certain things grow pretty quickly. You might have to - for example, with tomatoes - before I have had to bump my tomatoes into a slightly larger pot. And how I made that decision was basically just on how quickly that soil media was drying out. Those tomatoes were drying out and they had to be watered multiple times a day. They were starting to show signs of nutrient deficiency. So I figured it was worth my effort to actually bump them into a larger container so that they'd be at in their best condition, at their healthiest, when I went to move them into the garden.
Nate Bernitz 33:46
Really just an act of necessity there I guess.
You mentioned how these seeds really look so similar with just that first set of leaves. So really helpful to label right. I assume you do label your your pots, what do you write on those labels? Just the name of the plant? Or is there anything else that you find helpful?
Emma E 34:22
I do. I will at the very least write the variety down. Because usually I'll recognize what that plant looks like as it gets a little bit bigger. But if you're newer to gardening, write down the the type of plant, write down the variety and I think it's helpful to to write down the date of when you actually sowed that seed. Because again, on seed packets, you're going to see information that's going to say the number of days to germination. For a lot of cases, it'll be somewhere between seven to 14 days. And that helps you keep track of whether things are moving along the way they they should or not. So let's say I plant the seed and the packet said I should start to see growth within seven to 14 days and three weeks later, nothing's happening. That tells me that I probably need to sow some new seeds. If I don't put the date on there, it becomes hard to keep track of that.
Nate Bernitz 35:16
There's kind of two periods here. There's the period between when you've put the seed in and it germinates; you actually see the plant coming out of the ground. And after that occurs, so what changes? I assume you're having to keep that potting medium moist. Before and after, you mentioned how you might as well just have those grow lights on before and after. I'm wondering about fertilization, I'm wondering whether you need to up your watering as those plants mature. How do you think about that?
Emma E 35:50
Well, fertilization is definitely going to come into play. So the seed-starting mix that we've talked about doesn't come with any nutrients in it at all. That's because seeds don't need those nutrients right away. But as they continue to grow, those seedlings are going to exhaust the original stores of energy that they had within those seeds. They're going to need those nutrients from someplace else. So it becomes essential once those seedlings have a few sets of true leaves. Once the leaves look like they showed on a mature plant, then you'll want to start using a fertilizer and for indoor seed starting, I recommend using a complete water soluble fertilizer. That could be something like a 20/20/20. You have all of the three main macronutrients: nitrogen, phosphorus, and potassium. Often, many of these products will also have some of the micronutrients included as well. With really young seedlings, typically, you can get away with using a half-strength fertilizer, because you don't want to burn those young new roots. So to play it on the safe side, go with a diluted fertilizer. And depending on the product that you're using, the recommendations might be to apply weekly, maybe to apply every two weeks. If you're not applying enough, plants are definitely going to tell you, you'll see signs of nutrient deficiency in the foliage. So leaves all start looking good. They're changing colors that they shouldn't be maybe yellows, maybe purples. And if you're doing too much, then you might actually be seeing some burning on that foliage. So the edges of leaves might might start to get brown and crispy, actually from salt damage from the salts that are in the fertilizer.
Nate Bernitz 37:53
Which might kind of look like too much sun as well.
Emma E 37:56
Yeah. So you have to do a little bit of troubleshooting there. It's useful to keep track of when you applied fertilizer, how much you applied, so that you can maybe try to sleuth out what's going on.
Nate Bernitz 38:11
Just to clarify, you said that you wait to apply fertilizer until you've seen the first true set of leaves. So not that first, kind of what false set of leaves.
Emma E 38:23
I would wait until the plant has three or four sets of true leaves. I would because actually those seed leaves, those are eventually going to fall off of the plant as it develops, as the the nutrients that are within those are used up. So I would wait a little while because if you start too soon the plant's just frankly not going to be using that fertilizer.
Nate Bernitz 38:53
Do you find that that's a source of confusion whether a set of leaves is a true set of leaves or not? Is there an easy way to tell whether the leaves are that first set of true leaves or are just another set of seeds leaves?
Emma E 39:07
Oh, that's a good question. So with all this, the majority of the seedlings that you're going to grow are what are called dicots, dicotyledon, so there's going to be two seed leaves. The first leaves that you see when a plant germinates, those are seed leaves. Any leaf, or any leaves that develop after that point, are true leaves as we call them. Those original seed leaves tend to be fairly nondescript. A lot of times they're just kind of oval shaped smooth edges. But when the true leaves come out, they look more like what you'd expect the the leaves to look like on that plant. So a seed leaf on a tomato is just kind of this little pair of leaves, but when the true leaves come out, you're actually seeing that deeply dissected, more like compound leaf of a tomato plant.
Nate Bernitz 40:03
That's really helpful. And just one more thing on fertilization. You mentioned this water soluble, complete fertilizer. The way I would imagine you doing that is you would take some measurement of water correlating to the instructions on the fertilizer, you mix it up, and then you pour it into the tray and the plants take it up through the bottom, is that the best way to do it? Or is it actually better to to pour it over the top and have that go through the potting mix?
Emma E 40:34
You can do it either way. Some people exclusively water their seedling plants from the bottom. That's a legitimate way to go about this. You could put the fertilizer in that way. I usually don't just because it to me is a little bit more work to water that way. So I'll water from the top and I'll apply fertilizer over the top. But either way is going to work just fine.
Nate Bernitz 41:01
So if you're using a water soluble fertilizer, is that a kind of powder? Or is that an actual liquid that you're putting into your water?
Emma E 41:11
The stuff I'm talking about is usually those blue crystals.
Nate Bernitz 41:16
Oh so you just sprinkle that on?
Emma E 41:18
No, I mix that up according to the label instructions. It's usually some sort of crystal and product that you're mixing into water. For starting seedlings, I usually don't use inorganic fertilizer, like a fish emulsion fertilizer, just because seedlings can't use it very well. Most of that fertilizer product is going to waste because there aren't any microbes in that seed-starting mix to break down that organic matter and make it available to plants. It's also really smelly. So I tend to save that for outdoors. I start using my organic fertilizers once I have plants outdoors in the garden, and I'm using more of these these chemical fertilizers indoors just to get things started.
Nate Bernitz 42:07
Okay, that makes sense. One other fertilizer question. I typically haven't seen seed starting instructions on fertilizer. I'll just see measurements for plants in general. What's your advice? Just to use half that recommendation for seed starting?
Emma E 42:28
Yeah, exactly. If you buy a product that says it's listed for flowers and vegetables, there will be instructions on the packaging that tell you how you should mix it up for those plants. For seedlings, I do half-strength. Just dilute whatever that recommendation is so that you're applying it at half strength.
Nate Bernitz 42:49
Let's talk about lighting. This is a source of confusion for sure. It sounds easy enough, just get a great light, but we know that it's not that simple. For one thing when you go to the hardware store, the big box store or somewhere like that, they may not have grow lights. You're going to be looking at a long aisle of a lot of different fluorescent and LED light options. So how do you actually make a decision on what lights to use? Is there something you should be using in particular or do you actually have to go to some specialty store where they do sell grow lights?
Emma E 43:31
I actually do think that it's nice to buy your grow lights from a greenhouse supplier or Garden Supply Company so that you know you're actually getting lights that are intended for plant use, that should be kicking out the the wavelengths that plants need and the intensity of light that plants need. Short of that, if you really want to get one, let's say get into LEDs which a lot of people are interested in, then I would definitely be buying those from a greenhouse supplier so that you know you're getting good quality plant lights. If you're looking for the most affordable option that's honestly pretty foolproof that people have been using for decades, it's just good old fluorescent lights that you put in a shop light fixture. Those fluorescent tubes are what I've always used for indoor seed starting and honestly it works really well and it's nothing in particular, just cool white bulbs or a full spectrum bulb will work as well.
Nate Bernitz 44:40
Any more specificity there? I've seen the different numbers and things like that. There are a lot of choices when it comes to buying lights.
Emma E 44:49
I've always gone with T-8s. There's T-5s I think what T-12s, but T-8 bulbs worked just fine for me with with fluorescent fixtures. Usually there's not a lot of heat kicked off by these. The bigger thing that you're dealing with is just having the right intensity of light for those seedlings. It's something you'll probably have to experiment a bit with in your own setup you have at home. Plants will tell you pretty quickly whether they're getting enough light or not. There's some symptoms that show up really quickly. With plants that are either getting too much or not getting enough or if they're too close to the light fixture. So if those seedlings aren't getting enough light, their stems are going to get really, really long. You're going to have this this really long, skinny, spindly stem that that isn't very strong at all. And if you're really not getting enough light, then the the foliage might might be kind of pale, too. That's what you see with dark grown seedlings. If there's too much, and usually it's not so much that there's too much, it's just that the plants are too close to the lights and then the heat that's getting kicked off will damage them, you'll actually see signs of burning on the foliage - dead areas on the foliage - where it's too close to the lights. If you're using the TI 8 fluorescent bulbs in a shop light fixture, usually about six inches is that sweet spot for the lights being kept away from the seedlings. So no matter what system you're using for your grow lights, you do want to make sure that it's easy enough to raise and lower them as needed based on what your seedlings need, because these plants are going to grow to light. So you're going to need to raise that light up over the course of the seedling's life.
Nate Bernitz 46:54
How much room do you need to give for these plants to grow? If you're designing your system, and you're wondering, okay, how far away does the one shelf need to be from another, you're thinking about ultimately, how high can that light go? In your experience with these different vegetables and flowers, how tall are they getting before they're going out to the garden?
Emma E 47:17
I guess I would do probably at least 18 to 24 inches in between shelves. If you have a whole shelving rack of seedlings, tomatoes potentially can get quite tall while you have them indoors depending on when you started them. Some of the annual flowers too. Let's say you're growing cosmos, they can get really tall. So you're going to need that extra height. Hopefully, if you've started your seedlings at the appropriate time for when you're going to be able to plant outdoors, they're not going to have outgrown that space.
Nate Bernitz 47:55
Well, because the fixture takes up a few inches, and then you said you need six inches between the fixture and the plants, so if a plant is getting up to a foot or something, I would think you might need even a bit more than 18 inches.
Emma E 48:13
Yeah, potentially. Like I said, it's going to depend a bit on what you're growing. If you're producing a whole bunch of tomatoes, you'll probably need a little bit more space. If you're, let's say growing something like an onion, it's not going to get all that big under the lights and 18 inches is probably going to be more than enough.
I think the best system is one where it is possible to move things around.
Nate Bernitz 48:53
Okay, so ultimately, how do you actually know when seedlings are ready? Is it more just a matter of It's time for these to go out whether they're ready or not? Does it get to the point where the soil is warm enough and we're past last frost? Like it's go time and you want to get them out there, even if they're not quite ready.
Emma E 49:13
I guess if you were trying to grow out garden center-quality seedlings, then you would want them to have root systems that fill up the entire pot that you've grown them in and have at least three or four, maybe even five sets of true leaves. If you're trying to transplant a seedling when it's too small, it might not survive the process because the roots get so disturbed with you taking that seedling out of the pot, that it might not make it. But if that root system is really robust and is filling up that container nicely, then there shouldn't be really any trouble with transplanting at all.
Nate Bernitz 49:59
So that's just why it's so important to get the timing right of when you start them. Because we generally know how long it's going to take for it to get to that stage where it's ready to be transplanted. So timing is just so key then?
Emma E 50:12
Exactly. That's where having that whole chart going is really helpful. I think sometimes too, you might adjust things. Usually the recommendations on a seed packet or on a seed chart, it'll say something like eight to 10 weeks. So you're like do I do eight, do i do nine, do I do ten? So if you tried 10 weeks the first year, and your seedlings are grown out too much, then note that and be like, I think I could really get away with doing that at nine or eight weeks next year.
Nate Bernitz 50:49
That makes sense to be more conservative as a beginner. And as you get more comfortable, you can push the envelope in different ways, try and move up your window, get a little bit more aggressive, but you should have a good foundation of success.
Emma E 51:02
Yeah, if you're certain you'vereally got everything going right, if you've got the grow light setup, you've got the heat mat, you've got your good seed-starting mix, then you can probably start your seeds on that lower end of the spectrum. So if it says eight to 10 weeks, I'd probably start at eight weeks. If you have less than ideal conditions if it's going to be colder where the seedlings are germinating, then you'll probably want to go with that longer window. If you can't get that soil up to 75 degrees, then go with the ten weeks versus the eight weeks.
Nate Bernitz 51:38
I've heard a lot about hardening off, which is that transition period. You're not just taking plants from under your grow light and walking out and planting them in your garden. They need to get accustomed to being outside, accustomed to that different type of intense summer light and all of that. So do you need to wait until the root system is filled out until you've got enough true leaves before you start the hardening off process? Or can the hardening off process also be part of those plants getting to where they're ready to be transplanted?
Emma E 52:14
I would probably wait to do the hardening off process until those plants are ready to be transplanted or very, very close to being ready to be transplanted. I think if you're doing it too soon, you're probably putting a little bit of stress on that very young plant that's unnecessary. So once you're getting close to when you want to transplant, when it's going to be appropriate for you to transplant outdoors, that's when you want to start hardening things. Basically that means getting plants adapted to outdoor conditionsmeaning sun exposure, wind exposure and and exposure to cooler temperatures as well.
Nate Bernitz 52:53
Say more about that. How long does that process take? And where are you actually doing that? How do you actually experience and get that gradual process? I kind of find that to be overwhelming just looking outside like okay, where do I put them first? And where do I move them after that?
Emma E 53:14
So I think ideally, you're going to do your hardening over about a two week period. So it's nice and gradual and your plants don't really experience much stress at all. When plants go from indoors to outdoors, they basically are not ready to be exposed to direct full sun, even if they've been under a grow light. So if you have a shady area in your property, let's say underneath a tree, it's appropriate to bring them from indoors to outdoors and have them underneath that tree initially. Then over the course of a couple of weeks, you're going to gradually bring those plants out into full sun for longer and longer periods. Basically tapering over the course of two weeks until by the end of that period, when that plant is in full sun out there for the entire day. If you don't have a setup like that, and what a lot of people do, is set up a little shade cloth situation. You can buy material that's made expressly for this purpose of actually blocking out some of the sunlight to transition plants or to grow plants that require more shade outdoors. You can set up your little shade cloth transition area. If you're really trying to push the envelope with hardening your seedlings, you might have to bring them indoors at night. If there's still a chance of really cold temperatures or frost. If that sounds like too much work to you then you'll want to do your hardening process once the chance of frost is gone so that you can leave things out all night.
Nate Bernitz 54:57
Okay, that makes sense. I have recently seen a lot of people with these pretty cheap, actually little plastic greenhouses. We hear questions about those all the time. What are they good for? What can I do with them? Is hardening off one part of gardening where they actually could really come in handy?
Emma E 55:16
Yeah, I think that could be a really good use for some of those those inexpensive, unheated greenhouse structures.
Nate Bernitz 55:22
Yeah, how would you use it in that way.
Emma E 55:24
That that greenhouse is going to block out some of the light that's coming in. Not a lot, most of that's going to be transmitted. But if I was bringing seedlings that have been grown indoors out to the greenhouse, I might have some shade cloth over them, or some remain, or something that's going to protect them a bit. Andover the course of a week or so, take that off.
Nate Bernitz 55:53
Yeah, I guess that plastic structure gives youa pretty easy ability to drape stuff over it.
Emma E 55:59
Absolutely.
Nate Bernitz 56:02
It's gonna protect the plants a little bit from the elements. Also from animals or pests or things like that. It's literally an enclosure. I know there are pros and cons with those, but enough people have them that it's helpful to know what to do with them.
Emma E 56:17
Well, in the daytime, temps inside those structures will be considerably warmer than the outside temperatures in the spring. So that'll definitely help boost growth as well. You'll just have to pay a little bit closer attention to watering.
Nate Bernitz 56:30
I know that there are a few common issues with seed starting. You've mentioned that if your plants are leggy, that means not enough light. You've mentioned discolored leaves could be indicating a nutrient issue. And you talked a little bit about that. Another one that we hear a lot about is something called dampening off. What is that? What does that look like? And what's the solution?
Emma E 56:57
Damping off is actually a fungal disease. It happens sometimes if potting media is tainted in some way, or if you're using containers that hadn't been cleaned out. Basically, what happens if you have very cool conditions is it's favored by cooler temperatures. So if there are cool, damp conditions where you're starting your seedlings, seeds will actually rot right at the soil line. The stems of the seedling will, so what you'll notice first typically is that all of your seedlings are tipping over. When you look really closely, you'll notice that it's actually rotten at the base. The best way to get around this is to keep that soil media warm. Because only seedling plants are susceptible to this and again, when it's cooler temperatures, that's when it's more likely to happen. So keep that soil media warm to help prevent this disease and seedlings are going to grow faster and get out of that vulnerable stage. Use a clean potting mix in clean containers when you go to start your seedlings.
Nate Bernitz 58:09
Okay, that is really important information. I'm glad we got to talk about that a little bit. One other issue I've heard about is poor root development. So the roots are just never really seeming to fill out and therefore being really difficult to transplant. How can you ensure good root development?
Emma E 58:28
If roots really aren't developing on your seedlings I would probably be looking at the the potting mix that you're using and your watering practices. If you're using a really lower quality potting mix that's got big chunks of bark in it or it's just not very fine, the seeds might have a hard time growing in that media, especially very small seedlings. If you're over-watering, that can be another cause because basically if there is abundant water in that container, the seedling is never really going to have to grow its roots out further to be able to reach water. Especially as your your plants start to mature. It's important to let those containers dry out a bit before you water again. You don't want to get to the point of wilting, but you want to water just before you get there.
Nate Bernitz 59:28
Another one of those fine lines of gardening - not too much but not too little.
Emma E 59:32
Exactly.
This episode The featured plant is hyacinth bean lablab purpureus. Hyacinth bean is a beautiful member of the Pea family fabacea, that is native to tropical Africa. In New Hampshire gardens it can be grown as an annual vine. Hyacinth bean is highly ornamental, with purple tinged three-part of leaves in spikes of fragrant pea-like rose purple flowers that are followed by glossy ruby purple seed pods. Really, really beautiful. It is a fast growing vine that can grow 20 feet long and completely cover a trellis in a single growing season. Hyacinth bean is one of my personal favorites for covering arbors trellises fences and pergolas. This plant is easy to grow in gardens with average well-drained soil and full sun. Seeds can be sown directly in the garden after the last frost date. Or if you want to get a jump on the season, start indoors six to eight weeks earlier. Hyacinth bean roots don't like to be disturbed, though. So if you plant seeds indoors, grow them in biodegradable newspaper peat or cow pots so that you can plant the pot directly in the soil instead of needing to disturb the roots. Once hyacinth bean plants are growing in your garden, the only thing you'll need to watch out for are Japanese beetles, which thoroughly enjoy this plant, although they will rarely kill it. So if you're looking for an attractive and interesting vine to plant in your garden this summer, give hyacinth bean a try.
As we finish this episode, I'd like to share one more tip on how deeply to plant seeds. Planting depth can have a direct impact on seed germination. Planting too shallow may result in poor germination due to low soil moisture retention near the soil surface and planting too deep may exhaust the seeds food reserves before the seedling can reach the soil surface leading to seedling death or weak seedling development. Seed packets will almost always include instructions on how deeply to plant seedlings. If you don't have this information for some reason, then a good rule of thumb is to plant seeds at a depth approximately twice their diameter. Very small seeds should simply be pressed gently into the surface of the soil and then barely covered with media. When in doubt, plant a seed shallower. And remember, seeds will also germinate better with even soil moisture. Prevent potting mix from drying around germinating seeds by covering trays with dome lids, or covering individual containers with plastic wrap or plastic bags.
Nate Bernitz 1:02:53
Insightful tips as always, and I'm betting I'm not the only one excited to try my luck with hyacinth bean. That's gonna do it for today's show on seed starting, the eighth episode now of Granite State Gardening. Our goal with the podcast is to provide trusted, timely and accessible research-based information to you and fellow gardeners. We've been so appreciative of all the great feedback, suggestions and questions so far, but keep those emails coming. Our address is gsg.pod@unh.edu. And we're on social media at #askUNHextension where we post content regularly. You can help us grow this new podcast by sharing it with fellow gardeners and if you're so inclined by giving us a glowing five star review. Wherever you're listening, we really appreciate all the great reviews you've already left. Thanks for tuning in to another episode of Granite State Gardening. Until next time, keep on growing and starting seeds. Granite State gardeners, we'll talk with you again soon.
Granite State Gardening is a production of University of New Hampshire Cooperative Extension, an equal opportunity educator and employer. Views expressed on this podcast are not necessarily those of the University, its trustees, or its volunteers. Inclusion or exclusion of commercial products in this podcast does not imply endorsement. The University of New Hampshire, US Department of Agriculture and New Hampshire counties cooperate to provide extension programming in the Granite State. Learn more at extension.unh.edu.
Transcribed by https://otter.ai. Transcript edited by Rebecca Dube.
Related Resource(s)
Author(s)
